Turkey Work Stitch: Adding Fluffy Texture to Your Embroidery
Introduction to Turkey Work Stitch and Dimensional Embroidery
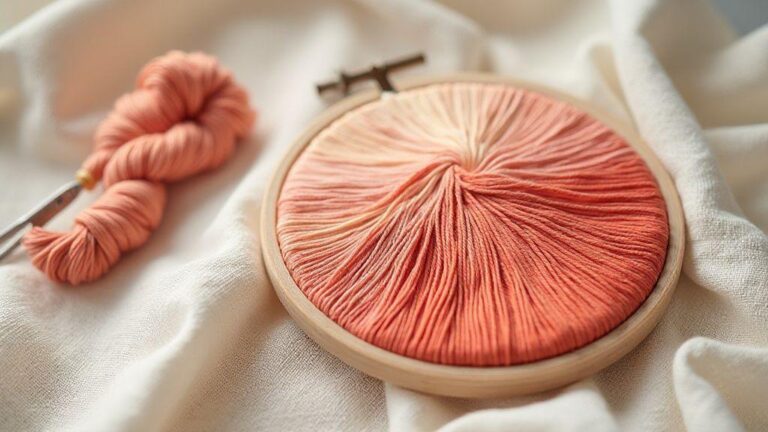
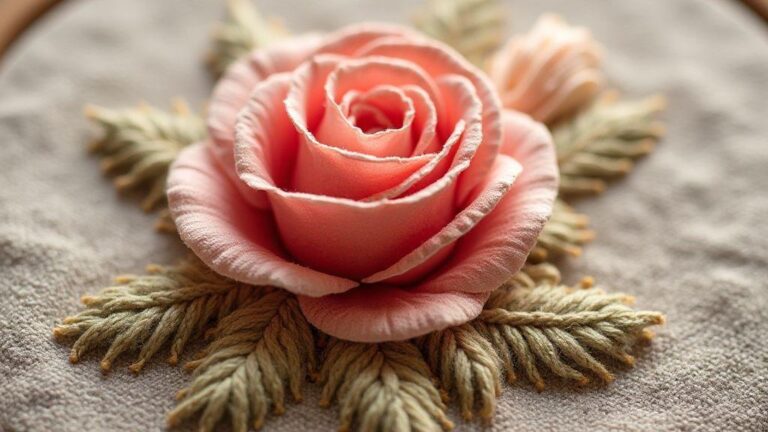
Turkey work stitch transforms your embroidery from flat and ordinary into a tactile masterpiece that invites touch and admiration. When you master this iconic loop stitch, you unlock the ability to create realistic fur, feathered textures, and dimensional effects that traditional embroidery simply cannot achieve. The turkey work embroidery technique stands apart because it adds physical depth to your fabric—viewers don’t just see your work, they feel compelled to run their fingers across it. This three-dimensional embroidery method has experienced a remarkable resurgence among contemporary fiber artists who crave texture and dimension beyond flat needlework. You’ll discover that adding fluffy texture to embroidery elevates your projects from hobby-level to gallery-worthy, making this technique essential for anyone serious about advancing their embroidery skills.
Why Texture Creates Emotional Connection
You understand intuitively that texture engages multiple senses—sight and touch combine to create a more memorable experience than flat imagery alone. The dimensional stitch technique of turkey work capitalizes on this psychological principle, making your embroidered pieces more engaging and memorable. When you incorporate raised embroidery into your designs, you create visual interest that photographs beautifully and feels extraordinary in person. This textured needlework approach appeals to modern crafters seeking to differentiate their work in an increasingly digital world. You recognize that embroidery with texture tells a richer story than traditional flat stitching, whether you’re depicting a bird’s feathers, an animal’s fur, or botanical elements that demand dimensional representation.
The Versatility of Turkey Work Across Styles
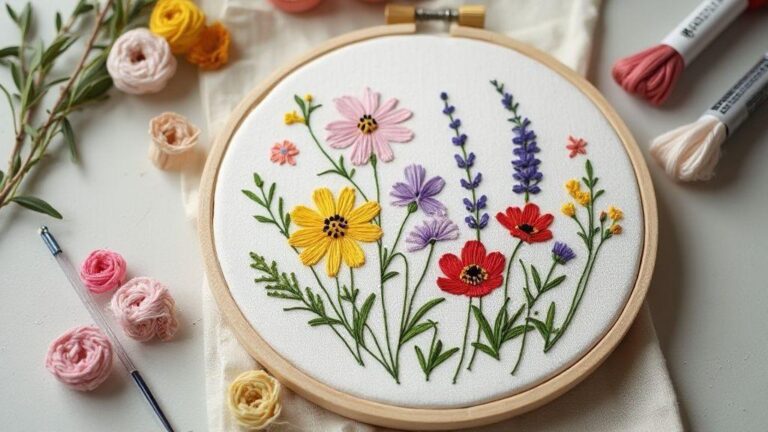
You can apply turkey work stitch to virtually any embroidery style—from traditional crewel embroidery to contemporary textile art. The loop embroidery technique works beautifully in realistic wildlife designs, abstract modern pieces, wearable art, and home décor projects. You’ll find that textured embroidery stitches like turkey work integrate seamlessly with other techniques, allowing you to create mixed-media pieces that combine flat stitching with dimensional elements. This embroidery dimension approach gives you creative freedom to experiment with different aesthetics. Whether you’re creating a delicate flower with fluffy centers or a realistic animal portrait with textured fur, adding dimension to embroidery becomes your secret weapon for creating standout pieces.
Understanding the Mechanics Behind the Magic
You achieve the distinctive fluffy appearance of turkey work embroidery through a deceptively simple mechanism: creating loops of thread that you either leave intact or cut to create texture. The pile stitch technique, as it’s sometimes called, relies on anchoring thread loops to your fabric base, then manipulating them to create height and volume. You control the fluffiness by adjusting loop height, thread weight, and density of stitches. This raised stitch method requires precision in execution but rewards you with results that no other technique can replicate. Understanding how loop stitch embroidery works mechanically empowers you to troubleshoot problems and innovate with variations that suit your artistic vision.
Essential Materials That Make Turkey Work Stitch Successful
Choosing Fabric That Supports Dimensional Stitching
You must select fabric sturdy enough to support the weight and tension of turkey work stitch without puckering or distorting. Linen represents the gold standard for textured embroidery projects—its tight weave holds loops securely and resists puckering even with aggressive tension. You can also work on cotton twill, canvas, or heavyweight cotton for dimensional embroidery projects. Avoid lightweight fabrics like muslin or thin cotton, as they cannot support the structural demands of loop embroidery. The fabric foundation you choose directly impacts your success rate; investing in quality material prevents frustration and ensures your fluffy texture embroidery maintains its beauty for years. You’ll notice that experienced stitchers prioritize fabric quality because it determines whether your raised embroidery stands proud or collapses into the weave.
Thread Selection for Maximum Fluffiness
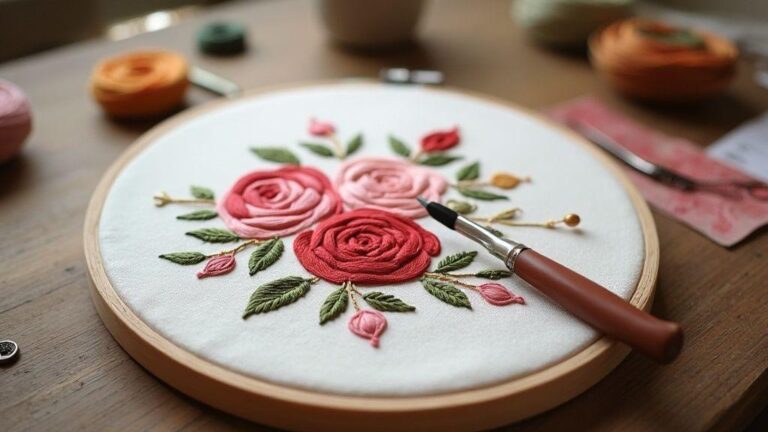
You achieve the most impressive results with embroidery floss that has natural body and texture—DMC, Anchor, and Madeira brands all work excellently for turkey work embroidery. The thread weight you select dramatically affects your final texture; thicker threads create bolder, fluffier effects, while thinner threads produce delicate, refined texture. You typically use 2-4 strands depending on your desired effect and fabric count. Wool thread creates particularly luxurious texture for textured needlework, though it requires careful handling. The color selection process matters equally—you can create depth by using multiple shades within a single loop stitch area, blending colors to create natural-looking fur or feather effects. This thread strategy transforms your dimensional stitching from simple to sophisticated.
Tools That Transform Your Turkey Work Experience
| Essential Tool | Purpose | Why It Matters |
|---|---|---|
| Sharp Embroidery Scissors | Cutting loops cleanly and evenly | Dull scissors create frayed, uneven texture |
| Embroidery Needle | Creating and anchoring loops | Wrong size prevents proper loop formation |
| Stabilizer (Optional) | Supporting fabric during stitching | Prevents puckering on delicate fabrics |
| Loop Gauge | Maintaining consistent loop height | Creates uniform, professional appearance |
| Needle Threader | Simplifying thread insertion | Saves time and reduces frustration |
| Magnifying Lamp | Seeing details clearly | Reduces eye strain during detailed work |
| Hoop or Frame | Keeping fabric taut | Ensures even tension throughout |
You invest in quality scissors above all else—this single tool determines whether your fluffy embroidery looks professional or amateur. Dull scissors create frayed, uneven edges when cutting loops, destroying the polished appearance you’ve worked to achieve. A loop gauge (a simple cardboard or plastic tool) helps you maintain consistent loop height, creating uniform texture across your turkey work stitch areas. These specialized tools aren’t expensive, but they dramatically accelerate your learning curve and improve your results immediately.
Mastering the Step-by-Step Turkey Work Stitch Technique
Preparing Your Fabric and Marking Placement
You begin your turkey work embroidery journey by securing your fabric firmly in a hoop or frame—tension matters significantly for this technique. You mark your stitch placement using a washable marker or light pencil, indicating where each loop should begin and end. This preparation phase prevents mistakes and ensures your dimensional embroidery follows your intended design. You thread your needle with your chosen floss, using the number of strands appropriate for your desired effect. The fabric preparation step takes only minutes but saves hours of frustration by keeping you organized and focused.
Creating the Perfect Loop: The Core Technique
You execute the turkey work stitch by bringing your needle up through the fabric at your starting point—let’s call this position A. You then create a loop by holding the thread loosely against your fabric with your non-dominant hand, forming a small arc. Next, you push your needle down at position B (directly beside position A), creating the anchor point for your loop. This loop creation process requires you to maintain consistent tension—not so tight that you distort the loop, not so loose that it falls apart. You bring your needle back up at position C (below position B), ready to create your next loop. This repetitive motion becomes rhythmic once you understand the mechanics, allowing you to work faster as you gain experience.
Anchoring and Securing Your Loops
You anchor each loop by pushing your needle down at position B, then immediately back up at position C, creating a small stitch that holds the loop in place. This anchoring stitch prevents your loops from pulling free during wear or handling. You maintain consistent loop height by using a loop gauge or by developing muscle memory for the distance between your anchor points. The securing technique you develop becomes automatic, allowing you to focus on maintaining even tension and consistent spacing. You’ll notice that proper anchoring transforms your textured embroidery from fragile to durable, ensuring your work withstands years of display or wear.
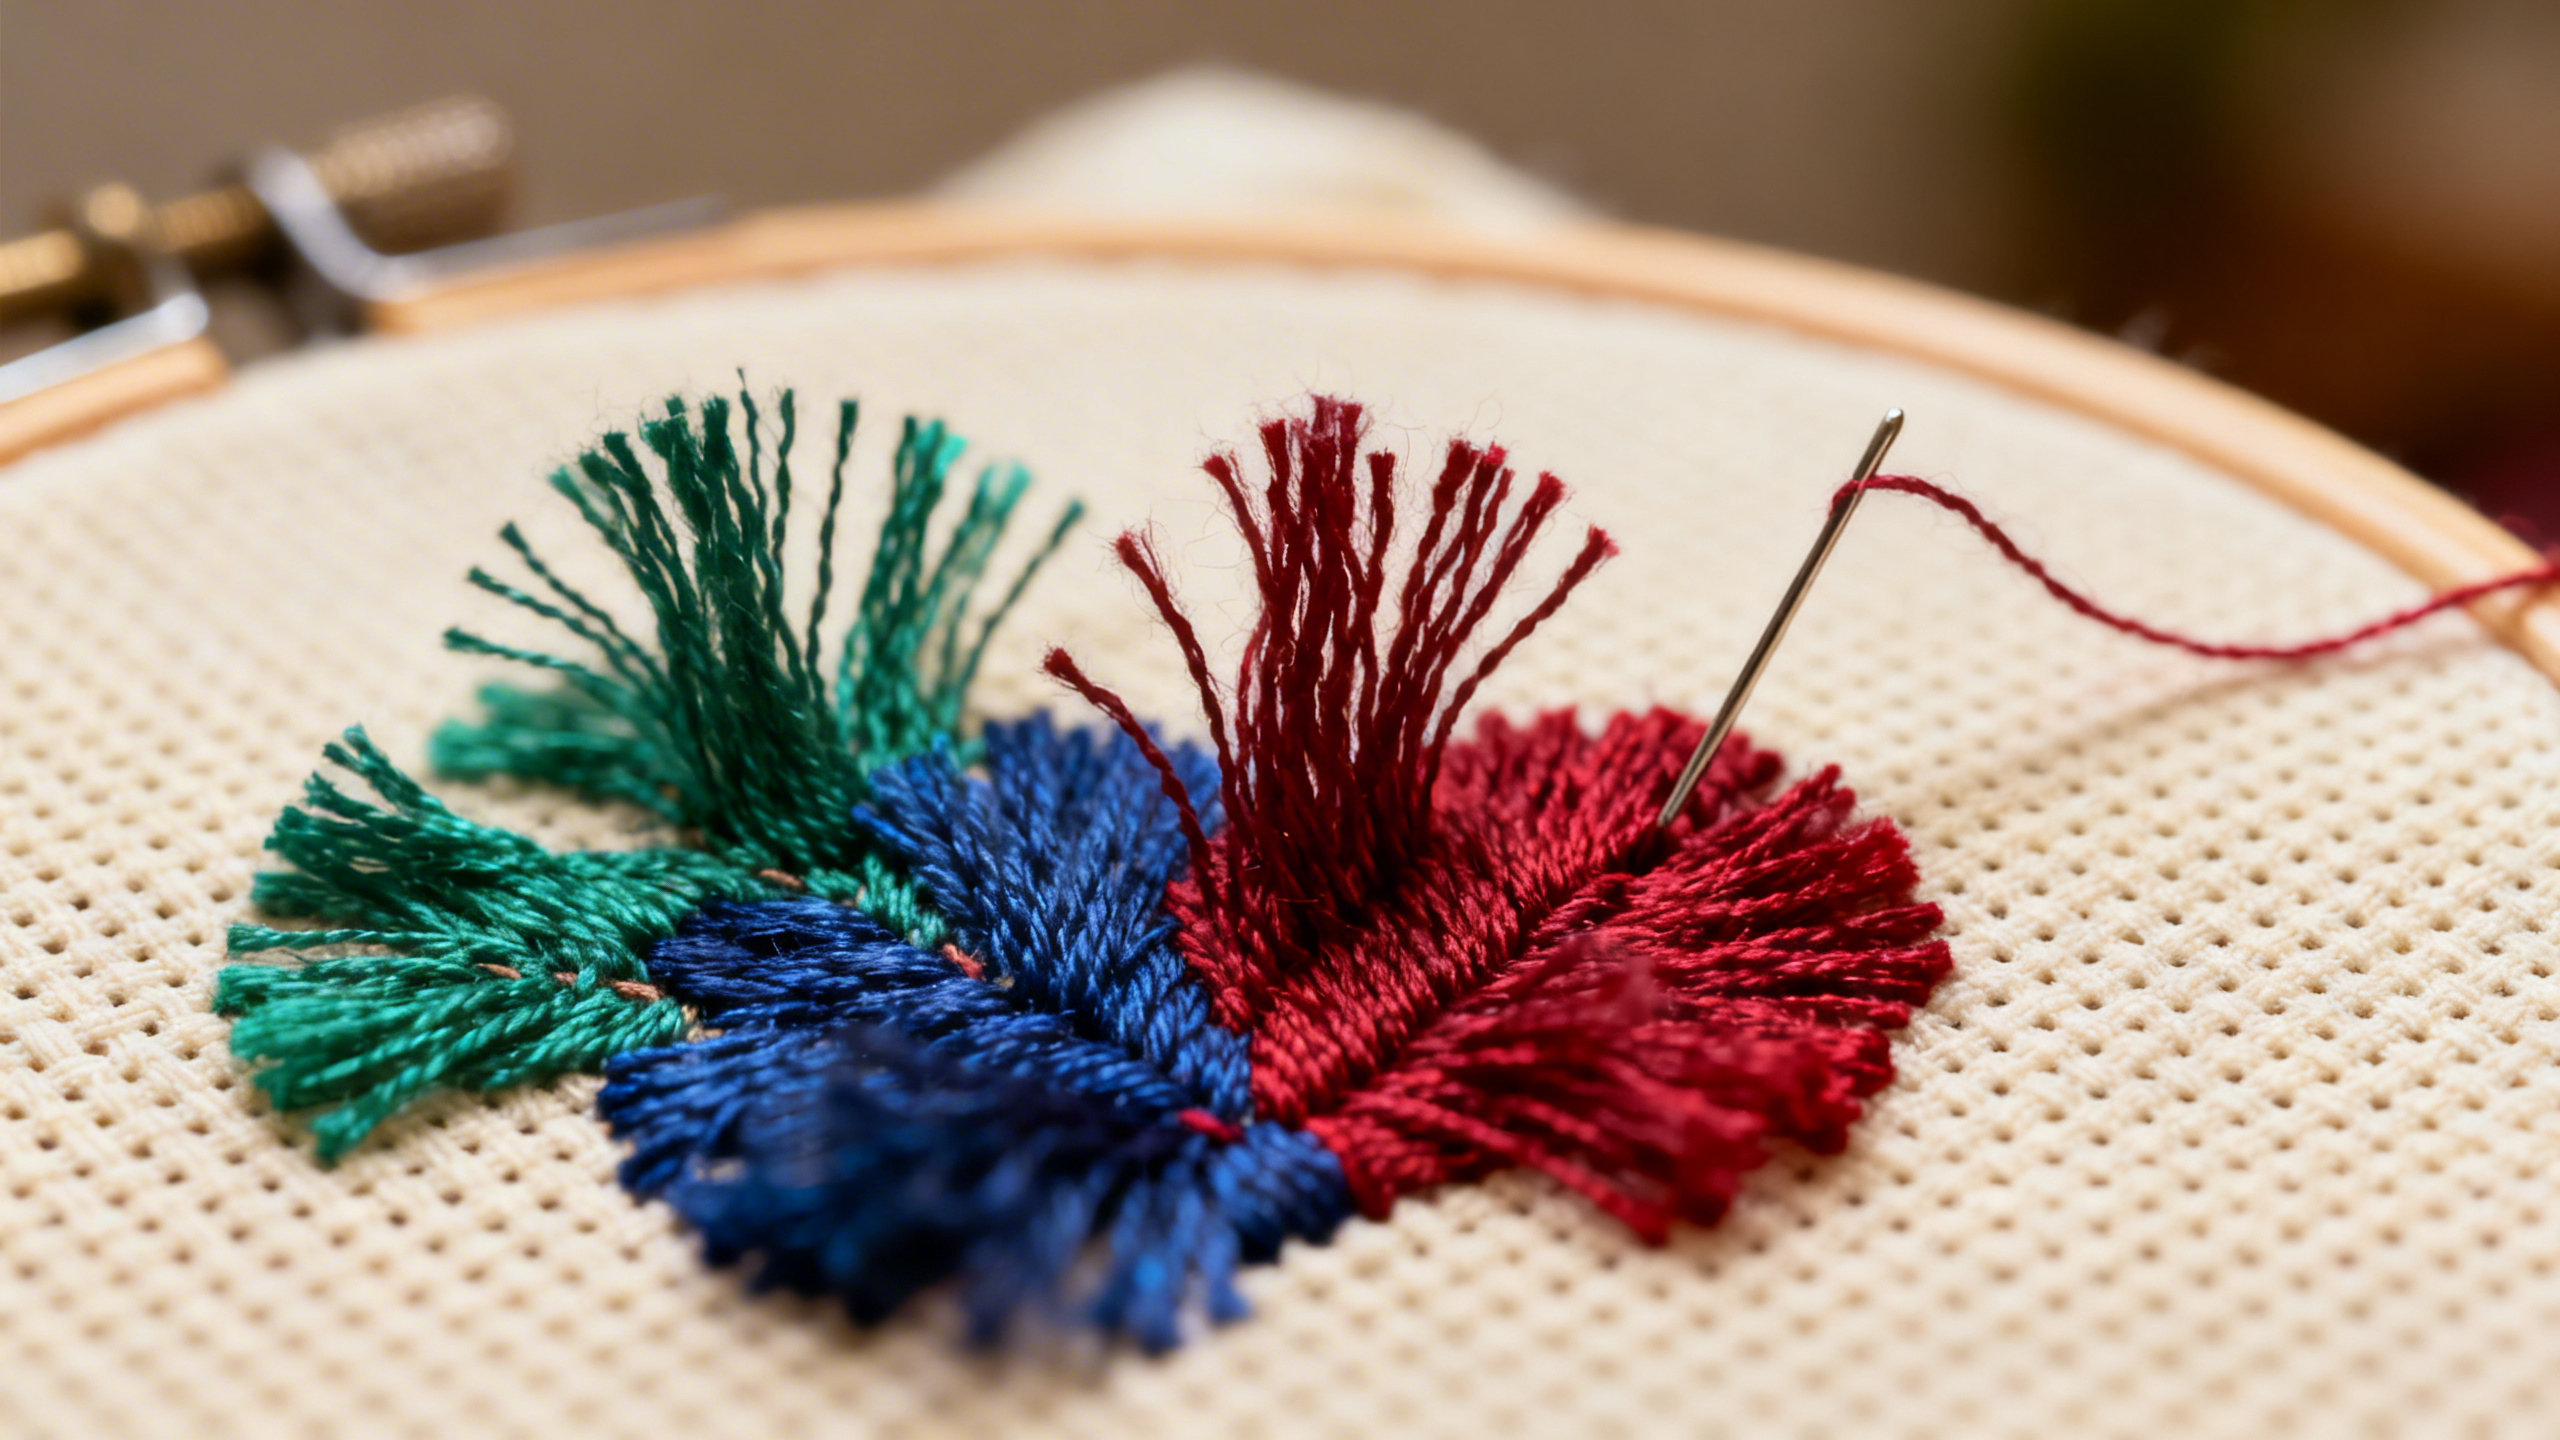
Cutting Your Loops for Maximum Fluffiness
You transform your loops into fluffy texture by carefully cutting them with sharp scissors. You position your scissors parallel to the fabric and cut through the center of each loop, creating two fluffy strands that stand away from the fabric. This cutting technique requires precision—you want clean cuts that create even texture without accidentally cutting your anchor stitches. You cut some loops fully while leaving others intact, creating varied texture that appears natural and organic. This selective cutting approach gives you control over how fluffy your dimensional embroidery appears. You’ll discover that the moment you cut your loops, your turkey work stitch transforms from simple loops into luxurious, three-dimensional texture that demands attention.
Adjusting Height and Creating Variation
You control the overall appearance of your fluffy texture embroidery by varying loop heights across your design. Taller loops create bolder, more dramatic texture, while shorter loops produce subtle, refined effects. You create this height variation by adjusting the distance between your anchor points—wider spacing creates taller loops, closer spacing creates shorter loops. This dimensional control allows you to create realistic effects; for example, longer loops in the center of a flower and shorter loops around the edges create depth and dimension. You can also create layered texture by stitching multiple passes of turkey work in the same area, building up fluffiness gradually. This advanced technique transforms your embroidery dimension from flat to sculptural.
Finishing and Securing Loose Ends
You complete your turkey work stitch areas by weaving your thread through the back of several stitches, creating a secure anchor that prevents unraveling. You avoid knotting on the back, as this creates visible bumps. Instead, you weave your thread through existing stitches on the reverse side, then trim excess thread. This finishing technique ensures your textured needlework maintains a professional appearance both front and back. You take time to inspect your work, fluffing any loops that appear compressed and ensuring even texture throughout your dimensional stitching areas.
Variations That Expand Your Creative Possibilities
Looped Turkey Work: Keeping Texture Intact
You create looped turkey work by leaving your loops uncut, producing a bushier, more voluminous texture. This variation works beautifully for depicting thick fur, dense foliage, or abstract textural elements. You can layer multiple passes of looped embroidery to create increasingly dramatic texture. This uncut loop technique requires less precision than cut turkey work, making it slightly more forgiving for beginners. The resulting fluffy embroidery appears almost three-dimensional, practically begging viewers to touch it.
Cut Turkey Work: Creating Hair-Like Effects
You achieve the most dramatic transformation by cutting your loops, creating individual strands that resemble hair or fine feathers. This cut loop technique produces the most realistic texture for wildlife embroidery and detailed animal portraits. You can vary the length of your cut strands by adjusting loop height before cutting, creating natural-looking variation. This selective cutting approach gives you maximum control over your dimensional embroidery appearance.
Layered Turkey Work: Building Depth Strategically
You create sophisticated depth by stitching multiple layers of turkey work stitch in the same area, with each layer slightly offset from the previous one. This layered texture technique produces incredibly realistic effects—perfect for depicting feathered birds or animals with complex fur patterns. You can use different colors in each layer, creating subtle color blending that enhances realism. This advanced dimensional stitching approach transforms your embroidery texture into fine art.
Color Blending Within Turkey Work
You elevate your textured embroidery by using multiple thread colors within a single turkey work stitch area. You alternate colors as you stitch, creating natural-looking variation that appears organic and realistic. This color blending technique works particularly well for animal fur, where natural color variation creates authenticity. You can also gradient your colors, transitioning from dark to light across your design. This sophisticated approach to loop embroidery demonstrates advanced skill and artistic vision.
Common Mistakes That Derail Turkey Work Success
Loop Tension Problems That Destroy Texture
You encounter tension issues as the most common challenge in turkey work embroidery. Too-tight loops pull your fabric and create distorted, uneven texture, while too-loose loops collapse into the weave and disappear. The solution involves finding the middle ground—your loops should stand proud without straining your fabric. You practice this balance on scrap fabric before starting your actual dimensional embroidery project. Many beginners grip their needle too tightly, transferring tension through their hands; consciously relaxing your grip improves your results dramatically. This tension awareness becomes second nature after completing your first textured needlework project.
Inconsistent Loop Height Destroying Uniformity
You prevent uneven texture by maintaining consistent distance between your anchor points throughout your turkey work stitch areas. Many beginners unconsciously vary their spacing, creating loops of different heights that appear sloppy. You solve this by using a loop gauge or by marking your fabric with light pencil marks indicating anchor point locations. This spacing consistency ensures your fluffy texture embroidery appears professional and intentional. You’ll notice that uniform loop height dramatically improves the overall appearance of your dimensional stitching.
Uneven Cutting Creating Ragged Texture
You achieve clean, professional-looking texture by cutting your loops with sharp scissors in a single, decisive motion. Dull scissors create frayed, ragged edges that destroy the polished appearance of your textured embroidery. You position your scissors carefully, cutting parallel to the fabric and through the center of each loop. This precise cutting technique separates amateur work from professional-quality turkey work embroidery. You’ll discover that investing in quality scissors transforms your results immediately.
Fabric Puckering From Excessive Tension
You prevent puckering by selecting sturdy fabric and maintaining moderate tension throughout your turkey work stitch work. Lightweight fabrics cannot support the structural demands of dimensional embroidery, so you choose linen or heavyweight cotton. You also avoid pulling your anchor stitches too tightly, which distorts your fabric weave. This fabric care approach ensures your fluffy texture embroidery remains beautiful and lies flat against your backing.
Using Wrong Thread Weight for Your Design
You select thread weight appropriate to your desired effect—thicker threads for bold texture, thinner threads for delicate effects. Using thread too thin for your design creates sparse, underwhelming texture, while thread too thick creates overwhelming, clumsy effects. This thread selection strategy requires you to consider your design intent before beginning. You can test different thread weights on scrap fabric to determine what works best for your textured embroidery vision.
Project Ideas Perfect for Turkey Work Stitch
Beginner Projects: Building Confidence Quickly
You start your turkey work embroidery journey with simple projects that teach fundamentals without overwhelming you. Flower centers represent the perfect beginner project—they require minimal stitching, teach loop creation and cutting, and produce immediate visual impact. You can complete a simple flower with fluffy texture in 1-2 hours, experiencing the satisfaction of finishing a project quickly. Small animal accents (bunny tails, bird wings) work beautifully for beginners, teaching you how dimensional stitching enhances realism. These micro-projects build confidence and motivate you to tackle larger challenges.
Intermediate Projects: Expanding Your Skills
You progress to more ambitious designs once you’ve mastered basic turkey work stitch execution. Realistic birds with textured feathers teach you how to layer loop embroidery and create complex texture effects. Textured landscapes incorporating trees, bushes, and grasses demonstrate how dimensional embroidery creates depth and visual interest. Animal portraits with detailed fur patterns challenge you to blend colors and vary loop heights for maximum realism. These intermediate projects typically require 8-20 hours but produce stunning results worthy of framing or gifting.
Advanced Projects: Creating Fine Art
You create gallery-worthy pieces by combining turkey work stitch with other advanced techniques and complex designs. Mixed-media embroidery incorporating beads, sequins, and other materials alongside textured stitching produces truly unique artwork. Large-scale wildlife pieces with intricate detail and sophisticated color work demonstrate mastery of dimensional embroidery. Wearable art featuring turkey work on clothing or accessories showcases your skill to everyone who sees it. These advanced projects may require 40+ hours but result in heirloom-quality pieces.
| Project Type | Estimated Time | Difficulty | Best For |
|---|---|---|---|
| Flower Centers | 1-2 hours | Beginner | Learning basics |
| Small Animal Accents | 2-4 hours | Beginner+ | Building confidence |
| Realistic Birds | 8-12 hours | Intermediate | Mastering layering |
| Textured Landscapes | 10-15 hours | Intermediate | Creating depth |
| Animal Portraits | 15-25 hours | Advanced | Demonstrating skill |
| Mixed-Media Pieces | 20-40 hours | Advanced | Fine art creation |
Pro Tips to Master Turkey Work Stitch Faster
Invest in Quality Scissors: Your Most Important Tool
You dramatically improve your turkey work embroidery results by investing in sharp, quality embroidery scissors. This single tool determines whether your fluffy texture looks professional or amateur. Dull scissors create frayed, uneven edges that destroy hours of careful work. You spend $15-30 on excellent scissors and use them exclusively for embroidery—never cutting paper or other materials that dull the blades. This tool investment pays dividends immediately, transforming your textured needlework from mediocre to magnificent.
Use a Loop Gauge for Consistent Height
You maintain uniform loop height by using a loop gauge—a simple tool you can purchase or create from cardboard. This height consistency ensures your dimensional embroidery appears professional and intentional. You position your gauge under your loops as you stitch, using it as a reference for anchor point spacing. This simple technique eliminates the guesswork from turkey work stitch execution, allowing you to focus on tension and consistency.
Practice on Scrap Fabric Before Your Real Project
You accelerate learning by dedicating time to practice turkey work stitch on scrap fabric before starting your actual project. You experiment with different loop heights, thread weights, and cutting techniques, discovering what works best for your style. This deliberate practice approach prevents costly mistakes on your real project and builds confidence. You keep your practice swatches, documenting your progress and creating a reference guide for future projects.
Work in Excellent Lighting to See Details
You reduce eye strain and improve accuracy by working in bright, focused lighting. A magnifying lamp or ring light reveals details you’d otherwise miss, allowing you to execute turkey work embroidery with precision. This lighting investment prevents headaches and eye fatigue, allowing you to work longer and maintain quality. You’ll notice that good lighting transforms your dimensional stitching experience from frustrating to enjoyable.
Document Your Progress With Photos
You stay motivated by photographing your work at various stages, creating a visual record of your improvement. These progress photos demonstrate how your textured embroidery skills develop over time, providing motivation during challenging projects. You can also use these images to troubleshoot problems, comparing your work to reference photos. This documentation practice creates a personal portfolio showcasing your turkey work stitch mastery.
Join Communities for Inspiration and Support
You accelerate learning by connecting with other embroidery enthusiasts through online communities, local groups, or social media. These supportive networks provide pattern recommendations, troubleshooting advice, and motivation. You’ll discover that embroidery communities offer free resources, pattern swaps, and friendship—transforming turkey work stitch from a solitary activity into a shared passion. Sharing your progress with others creates accountability and celebrates your achievements.
Troubleshooting Guide: Solutions for Common Problems
Loops Pulling Out or Coming Loose
Problem: Your loops keep pulling free from the fabric, unraveling your work.
Solution: You strengthen your anchor stitches by making them slightly larger and tighter. You ensure your anchor stitch passes completely through the fabric, creating a secure hold. You can also reinforce loose loops by adding a small backstitch over the anchor point on the back of your fabric.
Uneven Fluffiness Across Your Design
Problem: Some areas appear fluffy while others look sparse or flat.
Solution: You maintain consistent loop height and spacing throughout your turkey work stitch areas. You use a loop gauge to ensure anchor points are equidistant. You also verify that you’re using the same thread weight and number of strands throughout your design.
Thread Fraying or Splitting During Stitching
Problem: Your thread separates into individual strands, creating a messy appearance.
Solution: You use a needle appropriate to your thread weight—not too large, which splits thread, or too small, which requires excessive force. You also slow your stitching pace, allowing thread to pass smoothly through fabric without friction damage.
Fabric Puckering From Excessive Tension
Problem: Your fabric distorts and wrinkles around your turkey work stitch areas.
Solution: You consciously relax your grip and reduce tension throughout your stitching. You select sturdier fabric that can support dimensional embroidery demands. You also avoid pulling your anchor stitches too tightly, which distorts the weave.
Difficulty Creating Consistent Loop Size
Problem: Your loops vary dramatically in size, creating uneven texture.
Solution: You mark your fabric with light pencil marks indicating anchor point locations. You use a loop gauge to maintain consistent spacing. You practice on scrap fabric until loop creation becomes automatic.
Loops Appearing Too Sparse or Too Dense
Problem: Your fluffy texture embroidery either looks thin and underwhelming or overwhelmingly thick.
Solution: You adjust stitch spacing—closer spacing creates denser texture, wider spacing creates sparser effects. You also vary your thread weight; thicker threads create bolder texture with fewer stitches, while thinner threads require more stitches for equivalent coverage.
Color Bleeding or Thread Fading
Problem: Your thread colors bleed into adjacent areas or fade over time.
Solution: You use high-quality embroidery floss from reputable manufacturers (DMC, Anchor, Madeira) that resist fading. You avoid washing your finished pieces in hot water; instead, you gently hand-wash in cool water with mild soap. You also avoid exposing your textured embroidery to direct sunlight, which fades colors over time.
Your Next Steps: From Basics to Mastery
When to Combine Turkey Work With Other Stitches
You expand your creative possibilities by combining turkey work stitch with other embroidery techniques. You use backstitch to create outlines that define your dimensional embroidery areas. You incorporate French knots for delicate texture accents. You blend turkey work with long and short stitch for realistic shading and color transitions. This mixed-technique approach creates sophisticated, gallery-worthy pieces that demonstrate advanced skill.
Advancing to More Complex Designs
You progress from simple projects to increasingly ambitious designs as your skills develop. You tackle multi-color wildlife pieces with intricate detail and sophisticated texture work. You create large-scale compositions incorporating multiple turkey work stitch techniques and color blending. You experiment with abstract designs that push the boundaries of traditional embroidery. This progressive challenge keeps you engaged and motivated.
Developing Your Unique Artistic Style
You discover your personal aesthetic by experimenting with different approaches to turkey work embroidery. You develop preferences for certain color palettes, design styles, and texture effects. You create a signature style that makes your work instantly recognizable. This artistic development transforms you from a technique-focused crafter into a true artist expressing your unique vision through dimensional stitching.
Creating Portfolio Pieces for Exhibition
You document your best work, creating a portfolio that showcases your turkey work stitch mastery. You photograph pieces in professional lighting, capturing the texture and dimension that make your work special. You write artist statements explaining your inspiration and technique. This portfolio development prepares you for gallery exhibitions, craft shows, or online sales.
Selling Your Turkey Work Embroidery
You monetize your skills by selling textured embroidery pieces through online platforms, craft fairs, or direct commissions. You price your work appropriately, accounting for materials, time, and artistic skill. You develop a business model around your turkey work stitch expertise—selling finished pieces, patterns, or teaching others. This entrepreneurial approach transforms your hobby into a sustainable income source.
Teaching Others the Technique
You share your turkey work stitch knowledge by teaching workshops, creating online tutorials, or writing instructional content. You develop clear, step-by-step instructions that help others master this technique. You create pattern packs and video tutorials that generate passive income. This teaching role establishes you as an authority in dimensional embroidery while helping others discover this rewarding craft.
Your Turkey Work Stitch Mastery Awaits
Turkey work stitch opens a door to creating embroidery that transcends the flat and ordinary, transforming your work into tactile art that demands attention and admiration. You’ve learned that this iconic loop stitch requires minimal materials and modest skill to master, yet offers unlimited creative potential for artistic expression. Your journey from complete beginner to confident dimensional embroidery artist takes weeks, not years, with consistent practice and proper guidance. You now understand the fundamentals of textured needlework, the importance of proper materials, and the strategies that accelerate learning. Most importantly, you recognize that every master stitcher started exactly where you are now—with curiosity and a willingness to learn.
Take action today: gather your materials, select your first beginner project, and create your first turkey work loop. You’ll be amazed at how quickly your skills develop and how satisfying this ancient craft becomes. The embroidery community welcomes you with open arms, ready to support your journey. Your first finished fluffy texture embroidery piece awaits—and it’s closer than you think.

I’m Sophie Caldwell, the author behind granaboom.com, and I believe hand embroidery is one of the simplest, most relaxing ways to create something beautiful with your own hands. I started this blog to help beginners learn hand embroidery without feeling overwhelmed by complicated instructions or “perfect” results.
Here you’ll find beginner-friendly guides to decorative embroidery stitches, along with clear step-by-step practice ideas and patterns you can use to build confidence. My focus is on making the learning process easy: simple explanations, helpful stitch combinations, and small projects that look polished even when you’re just starting out.
Welcome to granaboom.com—grab your hoop, choose a few colors, and let’s stitch one line at a time.