Traditional Sashiko Patterns and Their Names Explained
Origins of Sashiko and Boro
Sashiko and boro grew from practical needs—stitching extra layers into everyday fabrics to block drafts and stay warm. Simple stitches turned rough scraps into useful garments, a diary of daily life written in thread. The work blends function with quiet beauty; repairs reveal winters endured and neighbors sharing scraps. Sashiko isn’t about wealth but making life livable, yielding patterns that feel earned.
Boro is the layered textile philosophy of mending and reusing. Each seam builds warmth, saves fabric, and tells a story. This invites respect for clothes and time alike.
How traditional sashiko patterns began
Patterns arose from needs: reinforce wear spots, use up scraps, and map area-based patchwork. Early stitchers chose grids, running stitches, and small geometric motifs for strength and rhythm, creating a recognizable visual language. Over time, patterns gained meaning—some protected crops or homes, others marked family identity. Practice was collaborative—neighbors shared tips, swapped fabrics, and the sense of community remains in every piece. A basic running stitch can become a lattice; a small motif can expand to a panel. The same stitches vary in delicacy or boldness depending on thread and tension, making practical art you can adapt to your wardrobe.
Indigo, mending, and everyday use
Indigo defines sashiko’s look: deep blue fabric with white or lighter blue stitches. Indigo signals durability and tradition, hides soil, and keeps repairs practical longer, continuing a habit of keeping fabrics out of landfills. Mending is central: a small tear becomes a deliberate pattern, adding texture and strength. Everyday use shapes designs—workwear, blankets for cold nights, children’s clothes that grow with them. Indigo teaches patience; color fades slowly as stitches darken over time, inviting a calm rhythm into daily life.
Historic features to spot
Look for sturdy running stitches and small, repeating motifs in white on deep blue. Patches layered like a sandwich show the garment’s life; boro-style patches with visible stitching extend its life. Geometry reveals a logic: grid-based patterns reinforce seams, curves or waves emphasize lines. Patterns can help date or trace origins by region or maker, and each mark is a breadcrumb back to the artisan.
Common Geometric Pattern Names
Simple lines and shapes carry meaning and history. These patterns form a visual language—recognizable geometry that becomes sturdy, timeless embroidery. Study the shapes, then choose stitches to highlight the geometry. Let the patterns guide a cohesive piece that speaks to the tradition.
If you’re overwhelmed, start with one familiar shape and trace it with stitches. As you gain confidence, mix patterns while staying anchored in geometry.
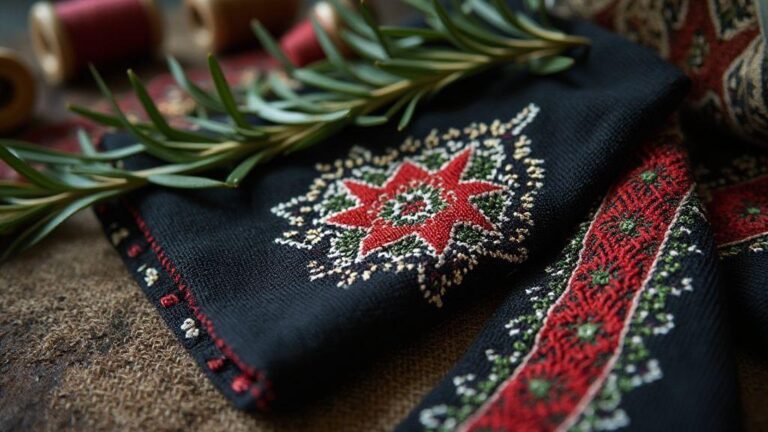
Asanoha sashiko meaning
Asanoha means hemp leaf. The pointed-leaf motif resembles a star when viewed from afar and symbolizes strength and resilience, making it ideal for durable fabrics. Asanoha works well on garments and quilts meant to endure daily wear; crisp lines suit light fabrics, while the pattern remains clear on heavy fabrics. It’s versatile for beginners and seasoned makers alike.
Kakinohanabishi sashiko pattern and sayagata sashiko pattern history
Kakinohanabishi, persimmon blossom, is a bold geometric flower motif with interlocking petals forming diamonds. It carries a long tradition of protection and luck. Sayagata, the gentle swastika, has older, nuanced meaning: protection, continuity, and life flow. In sashiko, it’s a gridwork that feels like a secret code; stitching Sayagata links you to a lineage emphasizing persistence and harmony.
Geometric designs names list
- Kikkō (turtle shell)
- Uroko (fish scale)
- Shuriken (ninja star)
- Seigaiha (waves)
- Ya-otoko (arrowhead)
- Tomoe (comma in a circle)
- Hishi (diamond)
- Kōgō (tangram-like blocks)
Meaning of Sashiko Motifs
Motifs carry stories, luck, and daily life. They guide your hand as you sew, inviting protection, good fortune, or a connection to nature. Motifs are not mere decoration—they’re a language woven into fabric, adding character as you learn what each stands for. The tradition remains active as you adapt motifs to your life. Two kinds of messages appear: protection and luck, or everyday life. Choose motifs that reflect your hopes; a simple square or wave can say a lot. Learning meanings deepens your pride and connection to the piece.
Protective symbols and auspicious designs
Protective motifs act as tiny guardians, signaling safety and warding off harm. Auspicious designs invite growth, harmony, and happiness, transforming repairs or new pieces into purposeful work.
Nature motifs and daily life meanings
Nature motifs connect you to seasons, water, wind, and growth—waves for resilience, plum blossoms for renewal, cranes for longevity. Daily life motifs tie to home, family, and work, reflecting routine balance and domestic life.
Japanese sashiko motif glossary
- Protection: safe-guarding motifs
- Auspicious: symbols of luck and harmony
- Growth: renewal and progress
- Longevity: enduring strength
- Nature: waves, flowers, birds, plants
- Household: everyday items or tools
- Balance: geometric shapes
Sashiko Stitch Patterns Guide
Sashiko uses simple stitches to create strong, clean patterns. Patterns may appear basic at first but become the foundation for more complex designs. Neat stitches keep fabric sturdy and the look crisp. Understanding rhythm helps weave stories into cloth like the masters.
Pattern names guide stitch choices and tension, enabling deliberate, repeatable motifs. Build confidence by naming each stitch in your own terms.
Think about balance and flow: a well-placed stitch can turn a patch into a conversation piece. The patterns below form a toolbox for repairs and artful embroidery, helping you finish pieces that read as intentional and durable.
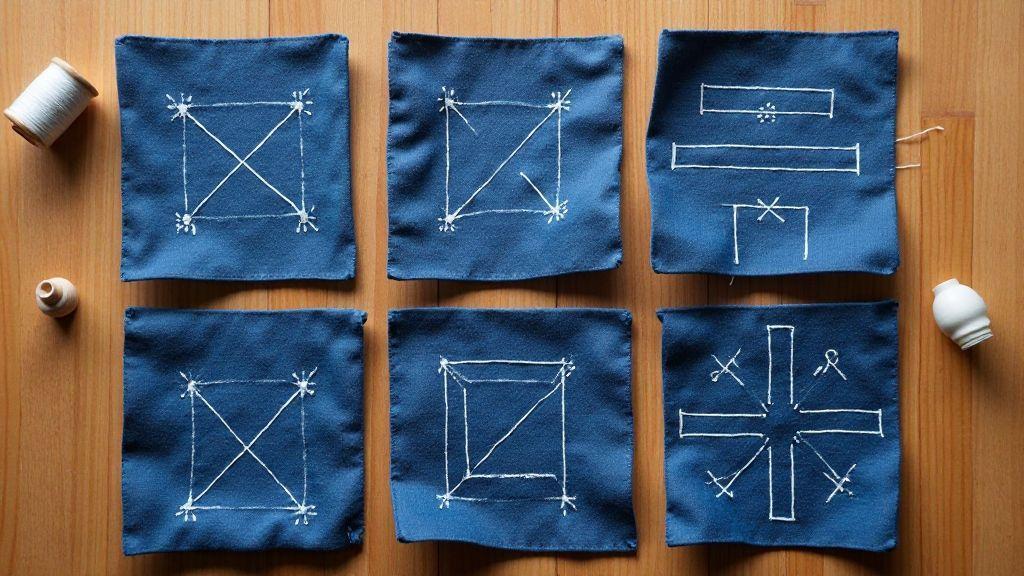
Hitomezashi counted stitch patterns guide
Hitomezashi relies on the rhythm of thread and space. Two initial rows guide stitching, and the resulting diamonds and bilateral symmetry emerge from offset rows. Practice with scrap cloth to learn timing: if stitches are too tight, lines collapse; if too loose, gaps appear. The magic lies in the quiet alignment of stitches and spaces.
Moyozashi, running stitch, and variations
Moyozashi is the steady heartbeat of Sashiko. Even, spaced stitches create a long, continuous line that can form borders, silhouettes, or outlines. Use Moyozashi as a foundation under more complex layers; variations—short or long stitches, curved lines—add texture and depth. Keep tension consistent for harmonious lines.
Basic stitch techniques to learn
Start with a comfortable grip and calm breath. Mark guides lightly and maintain even spacing and rhythm. Vary stitch length to emphasize borders or shapes. Maintaining tension is key: too tight causes puckering, too loose causes sag. End threads neatly with a small back stitch. These basics enable moving from simple grids to stories in fabric.
Antique Sashiko Pattern Identification
Antique sashiko shows tiny, even stitches in a neat grid as a sign of careful handwork. Variations in stitch length can be legitimate, but large gaps suggest later reproduction. True antiques often show slight irregularities from long practice, not machine errors. Aging thread is usually softer, with a fuzzy edge; the back of the fabric may reveal the pattern through the cloth, indicating hand-pulled stitches. Re-stitching or excessive repairs may indicate a later patchwork rather than original.
How you can check materials and dye
Antique fabrics use natural fibers like cotton or hemp; modern substitutes may feel slick. Indigo dominates traditional sashiko; true indigo fades gracefully into soft, uneven blues. Bright, uniform blues suggest modern dyes or recoloring. Quick test: dab area with acetone or alcohol to see if color bleeds; if it does, natural aged dye is likely.
Threads from vintage sashiko are usually cotton with a matte finish; if the thread is dry and fuzzy where the needle pierced, that’s a sign of age. The reverse side often shows a faint front pattern on the back from hand-pulled stitches. A perfectly neat back may indicate a reproduction. Also check for re-stitching signs; older repairs can be part of history, but too many repairs may indicate later patchwork.
Pattern repeats, wear, and regional clues
Authentic pattern repeats are deliberate and measured; perfect symmetry can indicate a modern reproduction. Real antiques show tiny spacing deviations. Wear along edges or rubbing areas reveals how the piece was used and stored, with sun fading hints on one side.
Regional clues link motifs to areas like Tohoku; patterns from a maker’s hand or region help confirm age. Generic patterns with no regional signature may indicate a newer piece.
Using Traditional Patterns in Your Projects
You want your work to feel authentic, not trendy. You’ll start by choosing traditional patterns that speak to you and fit your project’s purpose. Traditional Sashiko Patterns and Their Names Explained becomes your vocabulary, guiding how you stitch and layer. When you pick patterns, some feel bold and others gentle; you can mix them to tell a story on fabric or a wall hanging. This approach keeps your embroidery rooted in history while letting your own voice shine through.
You’ll also consider the fabric you’re using. A sturdy denim or linen welcomes denser stitching, while a lighter cotton needs restraint. By pairing the right pattern with the right material, you’ll avoid overdoing it and get a balanced, lasting piece. Think of it like composing a song: you need a strong melody (the main pattern) and supporting chords (the textures and colors) to make it sing. Your project becomes a conversation between cloth and thread.
As a guide, Traditional Sashiko Patterns and Their Names Explained provides a vocabulary you can apply to your projects. As you explore patterns, you’ll discover some feel bold and others gentle; mix them to tell a story on fabric or a wall hanging. This approach keeps your embroidery rooted in history while letting your own voice shine through.
Finally, you’ll learn to respect the tradition without copying it exactly. Use patterns as a starting point, then adapt them to your skill level and time. This is how you honor sashiko and boro while making something uniquely yours. Your work will feel honest, practical, and deeply satisfying.
Choosing patterns by meaning and scale
You’ll map meanings to your patterns, choosing ones that reinforce your message. A small, simple stitch can symbolize quiet resilience, while a bold, repeating motif can shout perseverance. By matching meaning to scale, you’ll shape how your piece reads from afar and up close. You’ll also consider how many stitches fit into your fabric; a dense design will look heavy on a light base, and a sparse pattern can breathe on a dark ground. The trick is to pick a mix that stays legible and intentional.
You’ll want to know common pattern names and what they traditionally signify. Some motifs represent protection, growth, or harmony. When you choose, you’ll notice your project gains a story, not just a decoration. Start with one main pattern and add a secondary motif to support it. If you keep the scale right—large motifs as the main feature and smaller ones as accents—you’ll create rhythm and flow that draw the eye naturally.
As you practice, you’ll document what each name means to you. A simple cheat sheet helps: note the mood, the fabric, and the stitch count. With this guide, you’ll pick patterns faster next time and keep your work consistent with your message.
Combining sashiko pattern names explained with modern design
You’ll mix traditional names with modern aesthetics to craft something fresh. Pair a classic looped motif with a geometric shape you’d see in contemporary textiles. The fusion makes your piece feel both rooted and current. Keep embroidery readable by balancing repetition with negative space. This blend lets the eye rest and travel across your project.
You’ll also experiment with color in a controlled way. Traditional sashiko uses a few color values, but today you can push the rule. Use bold contrast for the main motif and a subtle shade for supporting stitches. The key is to keep the names and their meanings intact while you push toward modern design. Your finished piece will look like you, not a museum display.
Test on scrap fabric first, and let your eye decide where the modern edge enhances the traditional name. When you get it right, your project speaks clearly: classic craft with a fresh voice.
Placement and practical tips
Place stitches where they’ll be seen and appreciated. Start with a central motif, then frame it with smaller patterns along the edges. Measure carefully and mirror patterns for balance so nothing fights for attention. Practical tip: mark guides lightly with erasable chalk to keep spacing even. Keep thread tension steady and choose a needle suited to your fabric. If you’re on rough ground, test stitches on a corner first to prevent puckering. Plan for wear—darning or reinforcing corners helps your piece last longer. Finally, document your process: note what you changed and why, so future projects evolve from your experience.

I’m Sophie Caldwell, the author behind granaboom.com, and I believe hand embroidery is one of the simplest, most relaxing ways to create something beautiful with your own hands. I started this blog to help beginners learn hand embroidery without feeling overwhelmed by complicated instructions or “perfect” results.
Here you’ll find beginner-friendly guides to decorative embroidery stitches, along with clear step-by-step practice ideas and patterns you can use to build confidence. My focus is on making the learning process easy: simple explanations, helpful stitch combinations, and small projects that look polished even when you’re just starting out.
Welcome to granaboom.com—grab your hoop, choose a few colors, and let’s stitch one line at a time.