Tracing vs Freehand: Two Approaches to Original Pattern Design
Tracing vs Freehand: Two Approaches to Original Pattern Design
Welcome to a practical guide on tracing vs freehand pattern making. This overview highlights the pros, cons, and best uses of each approach so you can decide what fits your next project. By understanding how tracing and freehand work together, you’ll gain speed, accuracy, and personal style in your patterns.
Decide what fits your project: tracing vs freehand
Choose how to bring your pattern to life based on your project. If speed and consistency matter, tracing is ideal: place a template on fabric or paper, press, and transfer the shape for exact repeats. If originality and spontaneity matter more, freehand lets you sketch directly on the material, tweak curves, and add personal flourishes. Your choice should hinge on how you value speed versus spontaneity and how closely you care about deviations from the template.
If you’re aiming for precision and uniform results across several pieces, tracing is often the smarter route. It reduces hand fatigue by following a fixed guide rather than shaping every edge yourself. But if your goal is originality and you want to capture a story or mood in the pattern, freehand gives you room to experiment, bend lines, tweak symmetry, and add imperfect charm that makes your work stand out. Consider whether you’ll reproduce it exactly many times or prefer each piece to feel slightly different.
As you test both methods, you’ll notice differences in speed, control, and personality in the final product. Tracing can feel clinical at first, yet it’s reliable. Freehand invites growth as an artist, but it requires practice to keep edges neat. Simpler shapes often sing with freehand, while intricate repeats shine when traced. A mix—trace the core shape for consistency, then add freehand details for character—can be a powerful workflow that honors your timeline, skill level, and the vibe you want your pattern to carry.
Understand pattern design pros and cons for you
Tracing offers exact shapes every time, which helps when you’re making many items or aligning with a pattern book. It speeds production once you have a template, but can feel less lively and limit personalization. Freehand lets you inject personality, adapt to material quirks, and respond to the moment. It yields unique results but invites more errors and tweaking. Balance how much you want repetition versus a fresh story with each piece.
Materials matter too. Tracing works well on sturdy fabrics or paper where the template remains stable and doesn’t tear. Freehand shines with soft, stretchy, or textured materials that respond to your touch. Your environment matters as well—clean, flat surfaces favor tracing, while a creative setup can inspire freehand play. Remember, you’re building a skill set: tracing sharpens accuracy; freehand builds confidence and quick decision-making.
Compare tracing vs freehand pattern design for your work
Tracing locks you into a clean baseline: set up a stencil, press, and transfer for consistent results across pieces. It’s ideal when you need to reproduce a design exactly. The downside is potential rigidity if your material has quirks or you crave flair not in the template. Freehand lets you bend the rules, adjust on the fly, and capture the feel of a curve with your eye. However, it introduces more variance, which can be either a design feature or a flaw depending on your goals. Let your project guide you: steady results call for tracing; a personal touch calls for freehand.
If you’re unsure, run a quick test: trace a simple shape on one piece and freehand the same shape on another. Compare performance with your fabric, tools, and lighting. Your own experience will tell you which method fits your needs and schedule best.
Quick checklist to pick one
- Do you need exact, repeatable shapes? Choose tracing.
- Is your goal to capture a unique hand-drawn look? Choose freehand.
- Will you work with many copies or one-of-a-kind pieces? Consider tracing for consistency.
- Do you enjoy improvising and adjusting as you go? Consider freehand.
- Do your materials warp or have texture that benefits from flexibility? Freehand can win.
Speed and accuracy for you: tracing vs freehand
Tracing locks you into exact lines from a template, ensuring repeatable designs stay consistent. Freehand relies on your eye and muscle memory, which can speed you up as you gain confidence. In either path, the goal is clean edges and a dependable finish.
Tracing provides a steady rhythm: place the pattern, follow the lines, and keep edges smooth. It reduces guesswork, preserving proportions across sizes or colors. Freehand can feel like flying when you know the shape well, especially for simple patterns or on-the-fly refinements. Speed in freehand grows with practice and comfort with your sightlines.
Why tracing often boosts your accuracy
Tracing gives exact edges, since you follow a ready-made line. This consistency keeps your project professional across pieces. It also reduces fatigue by letting your tool follow a prepared path. For delicate fabrics or tiny parts, the steadiness of tracing can be the difference between a good result and a great one.
When freehand can be faster for you
Freehand shines when the design is simple or you’ve built muscle memory. If you know the shape well, you can draw it quickly and adapt on the fly with small tweaks. It’s especially fast for patterns that evolve as you work, or when layering different pattern elements. When speed matters and you’re confident, freehand can be liberating.
Measure time and precision for your work
Test both methods: time tracing a standard pattern and compare with freehand attempts. Track edge accuracy with a ruler or calipers and note where adjustments save time or improve precision. Keep brief session notes: tool used, pattern size, tweaks made. You’ll identify a clear pattern of what slows you down or what sharpens your edge, helping you choose tracing or freehand with reasons rather than vibes.
Tools and materials you need for tracing and freehand
For tracing, prioritize a steady surface, light pencils, and clean paper that won’t tear. Use a pencil with a light touch and an eraser that won’t smudge. For freehand, prioritize a comfortable grip and tools that vary line weight. The goal is consistency and control, not perfection on the first try.
Your kit should include a tracing wheel or a lightbox for fabrics, plus tracing paper or pattern tracing sheets that don’t ghost. For fabric work, use a wash-away or heat-disappearing marking pen or chalk. If you scale patterns, keep a ruler, grid ruler, and a compass on hand. Practice will help you choose the right tool for each task, whether outlining a sleeve or redrawing a classic block.
Organize your workspace with a flat table and good lighting. Clips or weights keep patterns in place for tracing or freehand tweaks. If you travel, portable tracing wheels and small pads fit in a project bag. A smooth setup makes tracing vs freehand decisions smoother in the moment.
Essential tracing pattern drafting tools for you
Begin with a clean drawing surface, a responsive pencil, and a light eraser. A good ruler keeps lines straight and angles true, and pattern paper that doesn’t bleed helps you see every line clearly. A tracing wheel or lightbox saves time when transferring to fabric, and tracing papers or carbon sheets allow variations without losing the original. For complex curves, French curves help keep lines smooth. Practice simple shapes to build muscle memory before moving to drafted patterns.
Basic freehand pattern making supplies you need
Use a comfortable pencil (HB to 2B) for bold, adjustable lines, and a smudge-resistant eraser with a large drawing surface. A blunt or rounded tool helps vary line weight, adding depth. A flexible ruler and a compass assist with proportions and circles. Tape or light clips keep paper in place while you test fits. Marking gauges or corner templates help maintain reference consistency when creating repeatable blocks. Freehand is as much about feel as measurement, so give yourself space to explore.
Digital tracing vs freehand tool choices
Digital tracing lets you zoom, duplicate, and clean lines quickly, ideal for consistent replication across sizes or many revisions. Choose software with a gentle learning curve to keep you in your creative flow, and plan how lines translate to real fabric, including seam allowances and fabric stretch.
Freehand tools offer tactile control and a hands-on vibe you can’t fully replicate digitally. Draft rough shapes by hand, then refine with digital tracing to lock gaps and proportions. A hybrid approach—hand-drawn roughs plus digital refinement—often yields the best balance of reliability and personality.
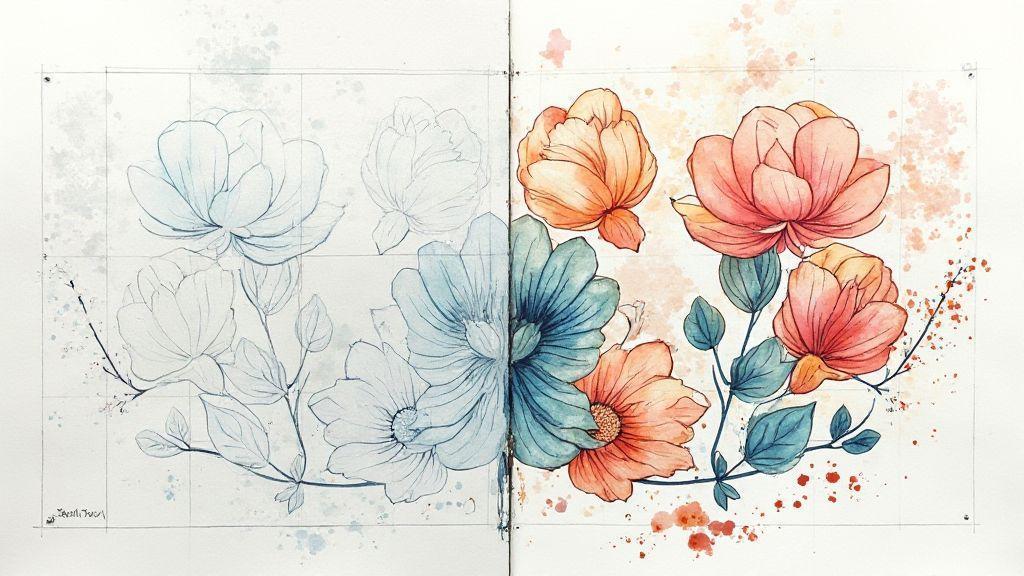
How you build skill: tracing pattern drafting vs freehand sketching
Tracing pattern drafting builds a solid base: copying a ready-made shape teaches precise curves and lines. This is like learning a song by playing the notes before improvising. You gain accuracy and an understanding of how pieces relate. Freehand sketching sharpens your eye and creativity: you test silhouettes, adjust fit, and gradually develop your own style. Balance the two—use tracing to learn and freehand to invent—so you grow without losing the basics.
Tracing builds mental shortcuts: when you place a pattern on fabric and align the grain, you’ll see lines, darts, and seam allowances become familiar. You’re not just copying; you’re building a reusable library in your hands. Freehand broadens your ability to express ideas and test proportions quickly, ensuring future tracing sessions are more purposeful and efficient.
Simple drills to grow your skill
Set a timer for five minutes and trace three pattern blocks with clean edges and precise seam allowances. Review stiff or loose lines, smooth curve transitions, and adjust as needed. Repetition turns accuracy into second nature, preparing you for real projects.
Learn tracing pattern methods step by step
Start with clean pattern paper, align the grain line, and place a simple bodice block. Trace key lines first, then add darts and seam allowances calmly. Compare your copy to the original and note variances to learn consistent pressure and placement.
Practice small adjustments—adding or removing a dart, shifting the waistline, or altering neck depth. Trace again with tweaks to see how these changes affect fit. This helps you move from a standard block to customized designs while keeping lines neat and measurements true.
Practice freehand sketching for patterns daily
Sketch a basic bodice from memory, then redraw with one deliberate change. Compare the two drawings to refine proportion sense and inform future sketches.
Practice freehand sketching for patterns daily
Take five minutes to rough-draw a sleeve cap, then refine the curve with light strokes. Don’t chase perfection at first; capture the idea quickly and tighten later. Regular practice builds line confidence and translates ideas into sharper silhouettes.
When you should choose tracing or freehand pattern making
Tracing and freehand each have strengths. In projects requiring repeatable results, tracing saves time and reduces drift. When originality and movement are key, freehand lets you explore new angles and silhouettes. The two approaches can work together: use tracing for core shapes and freehand for distinctive details depending on the project.
Use tracing for repeatable templates you need: intentionally reproduced shapes, master patterns, and consistent alignment across projects. Freehand is ideal for original pattern design techniques where you want to push boundaries, test new forms, and capture a personal voice in your work.
Use tracing for repeatable templates you need
Tracing locks in exact measurements and symmetry, perfect for building a library of repeatable templates. Create a master pattern once, then reuse it across projects with minimal drift. You’ll save time and reduce errors in production by starting from a clean original and tracing multiple copies. Keep a well-labeled set of templates for quick pulls.
Use freehand for original pattern design techniques you want
Freehand is your playground for originality—explore new angles, curves, and configurations not bound by a fixed template. Start with loose sketches and gradually tighten lines that support your ideas. Use quick mock-ups to test fit, adjust proportions, and iterate until the silhouette clicks. Freehand lets you experiment with texture, seam lines, and draping to give your designs a living, personal touch.
Project examples to guide your choice
For a quilting block set needing exact alignment, tracing is your friend: build a master block and reproduce it across the quilt with high consistency. For a bold fashion top with a dramatic hem, freehand helps you capture movement and personality, then refine with testing. If you’re creating screen-printed motifs, begin with tracing for the repeat, then add freehand accents to keep your signature touch. Tracing vs Freehand: Two Approaches to Original Pattern Design provides a framework to choose the right path, and you can blend them when both reliability and character are required.
How you protect originals in hand-drawn pattern creation
Your hand-drawn patterns form your artistic fingerprint. Protect them with dated records and safe storage. Organize drawings with titles, dates, and short notes to create a traceable history for reference or provenance. You can stamp or sign your work and add a subtle watermark on digital scans to prove authorship without ruining the design.
Practice mindful sharing. Only share what you’re comfortable making public, and use clear agreements when collaborating. Your originals thrive with steady, practical care rather than last-minute reactions.
Document your hand-drawn pattern creation as proof
Finish with a quick log: date, tools used, inspiration, and changes from the initial sketch. Photograph or scan your pattern with good lighting, and save files with clear naming that includes your name or initials, the pattern name, and the date. Keep both a high-resolution master and a shareable version. Off-site backups ensure your authorship trail remains intact even if something happens to your workspace.
When to digitize for backup and sharing your work
Digitize after finishing a pattern to create a reliable backup. Maintain clean, true-to-life versions for sharing, with watermarks as needed. Regular backups, ideally weekly, protect your time and creativity. Keep versions organized by date and stage to show the evolution of your pattern.
Simple steps to show your authorship
Mark your originals with a signature or consistent corner mark, and add a short note on the back with the title, date, and a brief description. Attach attribution when sharing: Pattern by [Your Name], created on [Date]. If collaborating, spell out each person’s role and contribution. Maintain an authorship folder containing sketches, logs, scans, and notes to demonstrate your journey from idea to finished pattern.
A tidy folder communicates that you value your work and are ready to stand behind it.

I’m Sophie Caldwell, the author behind granaboom.com, and I believe hand embroidery is one of the simplest, most relaxing ways to create something beautiful with your own hands. I started this blog to help beginners learn hand embroidery without feeling overwhelmed by complicated instructions or “perfect” results.
Here you’ll find beginner-friendly guides to decorative embroidery stitches, along with clear step-by-step practice ideas and patterns you can use to build confidence. My focus is on making the learning process easy: simple explanations, helpful stitch combinations, and small projects that look polished even when you’re just starting out.
Welcome to granaboom.com—grab your hoop, choose a few colors, and let’s stitch one line at a time.