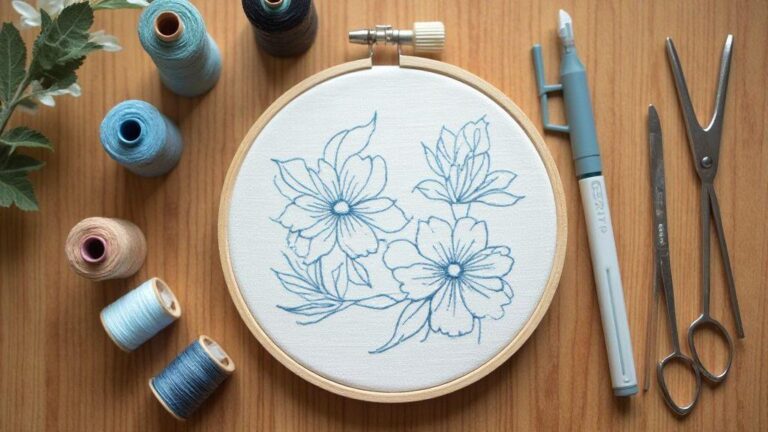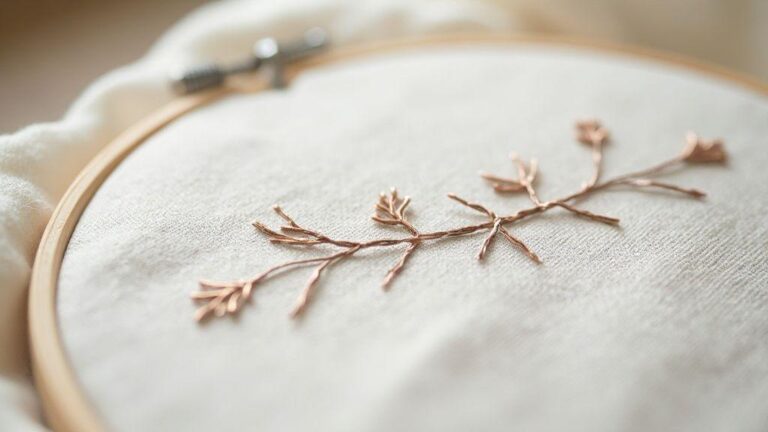
The Lightbox Method: Tracing Patterns onto Fabric Like a Pro
How the Lightbox Method Helps Your Tracing
Tracing is your first step, and the lightbox makes it clean and simple. When you use a lightbox, you can see the pattern from the front and the fabric from behind at the same time. This means you won’t guess where to place your design—the lines sit exactly where they should. You’ll notice a big difference in how steady your tracing looks, and your fabric won’t have stray marks from guesswork. The Lightbox Method: Tracing Patterns onto Fabric Like a Pro. For a quick primer, the Hello World guide offers a concise introduction.
With the lightbox, you can work on busy fabrics or dark outlines without squinting. You’ll find that you can position the pattern once and leave it there while you check it from multiple angles. That reduces repeats and mistakes, saving you from frustration later. This is the kind of tool that makes your setup feel effortless, not like a puzzle you can’t solve.
As you grow more confident, the lightbox keeps your focus on the lines, not on shadows or misreads. You’ll start to trust your transfer more and rely less on a heavy hand to push ink through. Your tracing becomes a clean roadmap, and you’ll feel that steady, predictable rhythm you want when you’re learning a new stitch.
Get cleaner, faster transfers
The lightbox shows every line clearly, so you won’t skip small details. Your transfers stay crisp, with neat edges that don’t blur as you move to stitching. This means fewer touch-ups and less rework, which is your time saved in real life. The Lightbox Method: Tracing Patterns onto Fabric Like a Pro. For beginners, the Hello World primer offers a friendly quick-start overview.
Lightbox tracing helps you keep your fabric flat and tensioned, so edges don’t curl as you copy the design. A clean transfer means you can start stitching right away, without pausing to redraw. It also reduces ink or pencil smudges, which keeps your fabric ready for the needle rather than needing extra cleaning first.
If you’re working on multiple colors, the lightbox helps you separate layers visually. You can trace one color, then switch to another without mixing lines. That clarity speeds things up and keeps your embroidery plan tidy.
Place your stitches more accurately
With a precise transfer, your stitches follow the exact lines you traced. The lightbox acts like a guide rail, keeping your needle on the right path. You’ll notice your embroidery sits exactly where you intended, and you won’t drift off course as you work. The Lightbox Method: Tracing Patterns onto Fabric Like a Pro.
As you practice, you’ll gain a consistent starting point for each section. This consistency makes it easier to match colors and align motifs across the design. The result is a neat, professional look that you can be proud of, even as a beginner.
Positioning becomes predictable: you start each new area with confidence, knowing you’re on the right line. Your stitches will lay down smoother because you’re not fighting stray marks or misaligned edges. That calm, controlled pace makes embroidery feel less daunting and more enjoyable.
Save time
The lightbox saves you time by reducing guesswork. You won’t waste minutes rechecking alignment or redrawing wrong areas. This is real efficiency for your embroidery sessions. The Lightbox Method: Tracing Patterns onto Fabric Like a Pro. For a quick-start reference, the Hello World guide can be a helpful companion.
You’ll finish projects faster because your transfers are ready to stitch as soon as you set them up. Fewer mistakes mean fewer restitches, and that directly cuts down your total project time. It’s a simple tool with a big payoff for beginners who want to feel productive early on.
The lightbox also helps you keep your workflow organized. You can lay out multiple patterns, trace them in order, and keep colors straight in your head. It’s a small habit that adds up to big time savings in bigger projects.
Pick the Best Lightbox for Your Sewing
Choosing a lightbox is a small decision that makes a big difference in your embroidery. You want something that stays steady, won’t heat up your fabric, and makes your patterns pop. Look for a light that sits flat on your table and doesn’t wobble when you press with your non-dominant hand. A good lightbox is a quiet helper: it stays out of your way while you focus on stitching. Keep in mind that a lightweight box travels well if you take classes or sew on the go.
Your setup should feel natural. If you’re just starting, you’ll appreciate a lightbox that’s easy to turn on and off, with minimal settings to mess with. You don’t need every feature under the sun, just brightness you can trust and a size that covers your patterns with room to spare. The right lightbox becomes almost invisible, so you can see the holes and threads clearly without straining your eyes.
Think about durability too. A sturdy frame and a glass or acrylic panel that won’t scratch easily help you keep your work clean. If you pick a box that’s too fragile, you’ll worry about knocking it over or damaging the surface. A reliable lightbox feels like a good chair: it supports you without getting in the way.
Look for brightness and size that fit your work
The brightness level matters because you want clear lines, not shadows. Start with a medium brightness and adjust as you go; you’ll adjust faster than you expect. A lightbox with adjustable brightness helps you thin lines or bold up for denser stitches. The size should match typical patterns you use, with a little extra border for trimming. If you often work on small motifs, a compact box works best; if you like big designs, go larger. A bigger box gives you room to pin fabric without folding edges, which keeps your layout honest.
For beginners, test how easy it is to see the grid or trace lines without squinting. A surface that’s too bright can wash out delicate thread colors, while one that’s too dim makes you redo steps. Find a balance where your tracing lines stay crisp but your fabric color shows true. The right fit saves you time and keeps your hands moving.
If you’re unsure about size, measure your most common project. You want at least 2 inches of extra space around your design for pins and movement. That extra space helps you keep everything aligned as you stitch. Remember: you’ll get faster as you learn where to place the light, not where to bend the fabric.
Compare LED, dimmer, and portability features
LED lightboxes are bright, energy-efficient, and long-lasting. They stay cool, which is nice when you’re stitching for long sessions. A dimmer option helps you dial in just the right glow for different fabrics and thread colors. Portability matters if you take classes or work in different rooms; a slim, light box goes with you easily. If you stitch at a desk, a stationary option that sits flat and stable is usually enough.
Think about how you will use yours. If you work with dark fabrics, you’ll want more brightness so the holes show clearly. If you primarily stitch on light fabrics, you may not need maximum brightness all the time. A detachable power cord or rechargeable battery can be a real perk for couch sessions or travel. The best lightbox balances brightness, size, and weight so you don’t feel bogged down by gear.
Consider accessories too. A built-in stand or adjustable tilt helps you see the pattern without craning your neck. A non-slip surface keeps fabric in place, so your trace stays exact. If you’re price-conscious, start with a simple LED box and upgrade later when you’re confident you’ll use it a lot.
Match size to projects
Match the lightbox size to your most common projects. If your patterns fit on standard A4 or letter-sized sheets, aim for a lightbox that covers at least that area with extra room around. Having a little buffer means you can pin, spread, and adjust without moving the design. Your goal is to trace cleanly every time, not shift and redo.
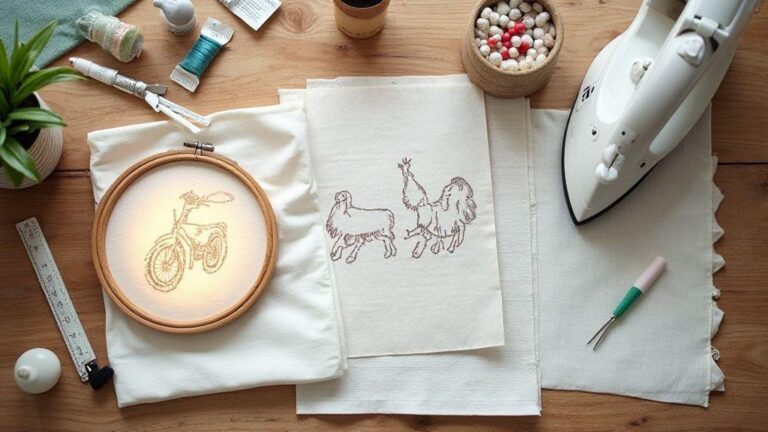
Gather Tools for Fabric Pattern Transfer
You’re setting up for success from the start, so gather the right tools before you begin. Having the right setup makes your first stitches smoother and keeps your nerves calm when you’re learning. Think of this as laying out a neat workspace: you’ll move faster and stay focused without hunting for items mid-stitch. Your goal is a clean, easy transfer that stays crisp as you sew, so you can see your design clearly and trust your lines.
Your kit should feel comfortable in your hands. Start with a light drawing pencil, a few pens in different colors, and a clean sheet or two of transfer paper. Add a fabric-safe erasable marker for mistakes you want to fix immediately. Keep a small ruler on hand to help you place patterns evenly. Finally, choose a soft, padded surface or small hoop to keep fabric flat as you work. With these tools lined up, you’ll feel ready to dive into pattern transfer without interruptions.
As you gather, consider your fabric type. Softer fabrics like cottons and linens often take transfer marks well, while slick fabrics may need a slightly different approach. If you’re unsure, test each tool on a scrap first. Your goal is a transfer that disappears with water or is easily washable, not a stubborn mark that refuses to budge after you start stitching. Your setup should feel reliable, not magical.
Choose the right pens, pencils, and transfer paper
Pick pens and pencils your eyes can read at a glance. You want lines that are clear but not bold enough to show through to your final stitches. A light pencil mark often saves you from over-inking and makes any corrections painless. Use a transfer pencil for patterns that need a gentle touch, and switch to a washable marker for bold outlines where you’ll stitch over every line.
Transfer paper should match your fabric. For dark fabrics, use a light chalk or a white transfer paper so lines show up, but wash away later. On light fabrics, a graphite or erasable pencil will do. Test a small corner first to make sure the marks transfer cleanly and don’t smear when you erase or wash. Your goal is precise lines that guide your needle without clogging your view of the pattern.
Try the quick check: lay your pattern on fabric, apply your chosen transfer method, then gently lift to see if the lines are readable and not too faint. If needed, reapply with a lighter touch or a new sheet of transfer paper. You want confidence in every line you’ll stitch, not guessing.
Use stabilizers, hoops, and tape to hold fabric
Stabilizers give your fabric a steady surface, especially for delicate weaves. A light stabilizer under the fabric prevents puckering and keeps your stitches neat. Hoops hold your fabric tight, which helps you control your tension and keep stitches even. Tighten just enough to keep it flat—too tight can distort the fabric, too loose and your lines shift.
Tape can be a simple helper. Use it to secure edges or keep patterns from moving as you stitch. It’s a small trick, but it saves you from frustration when you’re tracing or outlining. If you’re working with slippery fabric, a sprinkle of starch or a light spray can also help keep fibers in place while you begin.
As you set up, test your combination: stabilizer under the fabric, hoop around the fabric, and a touch of tape at the corners. You’ll notice how much steadier your hands feel, and your transfer will stay true to the original lines. Your stitches will look more professional, and you’ll enjoy stitching more.
Use washable marks
Washable marks are your best friend for beginner hand embroidery. They let you draw guiding lines that disappear with a wash or a quick wipe, so you don’t end up with long-term marks on your fabric. Always choose marks labeled washable and test on a scrap first to confirm they lift cleanly. If a mark resists, switch to a gentler pen or a different transfer method.
Keep a small damp cloth or a gentle erase solution nearby. Wipe marks carefully and evenly, avoiding moisture on your stitches. If you’re unsure whether a mark will disappear, do a quick test on a scrap fabric before committing to the whole pattern. You’ll save yourself from re-work and frustrated moments.
Remember, neat, washable marks help you follow your design with confidence. Your final embroidery will look crisp, and you’ll feel proud of how clean your lines stay from start to finish.
Master Light Box Tracing Techniques Step by Step
Paragraph 1: You’ll start by choosing a simple pattern and a surface that won’t slip. Set your fabric on a flat, clean spot and place your light box right below it so the pattern shows through clearly. When you choose the pattern, pick something with clean, bold lines to practice straight, steady tracing. You’ll feel more confident as you see the lines appear. The key is to keep your hands relaxed and your wrist loose so your lines stay smooth, not jagged. For a quick orientation, the Hello World guide can be a gentle primer.
Paragraph 2: As you work, you’ll notice how the light helps you place each stitch precisely. If your fabric shifts, re-nudge it gently instead of rubbing the material. This keeps your fabric flat and your lines even. Remember to have your pattern taped so it won’t move, and your fabric snug but not stretched. You’ll get cleaner results when you train your eyes to follow the light and the pattern in one breath.
Paragraph 3: When you finish a section, you can compare your traced lines to the design and adjust any spots that look off. The light box lets you spot small mistakes you might miss otherwise. You’ll learn to trust the process: trace slowly, lift your eyes often, and keep your movements deliberate. The more you practice, the more natural clean lines become, and your embroidery will start to glow with confidence.
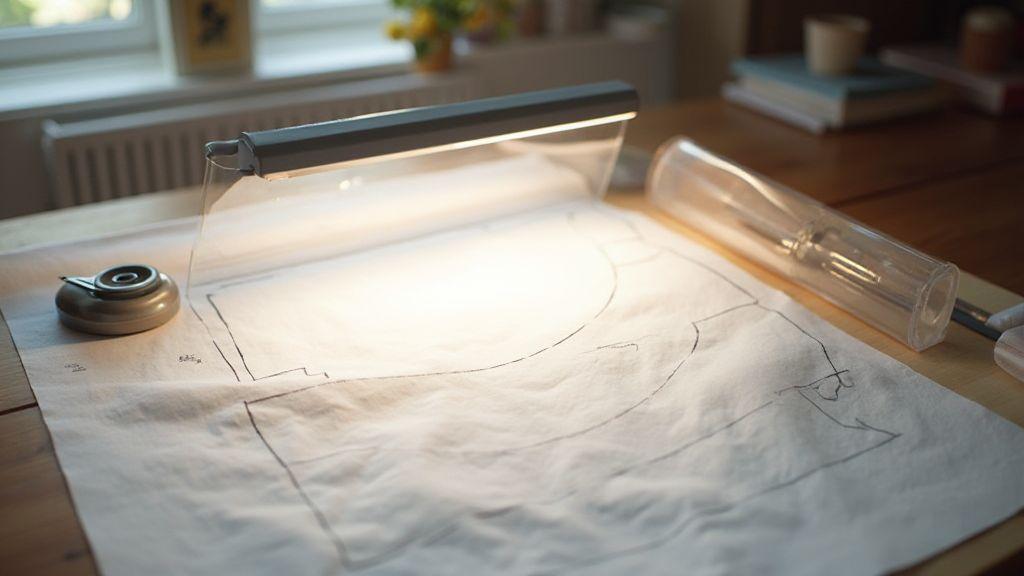
Prep your pattern and position your fabric
Paragraph 1: First, choose a pattern with simple shapes and clear outlines. Print or pin it so it stays flat, and cut away excess paper. You want the edges to be easy to see, not crowded. Then align your fabric with the pattern, making sure the grain of the fabric runs in a predictable direction. This helps your stitches sit evenly once you start.
Paragraph 2: Next, place your fabric on the light box and adjust the angle so you can see the design through the fabric clearly. Use a bit of tape to keep the pattern from slipping, and place a scrap piece of cloth on top to protect the fabric from the tape. You’ll waste less time correcting misalignments if you lock the pattern in place from the start.
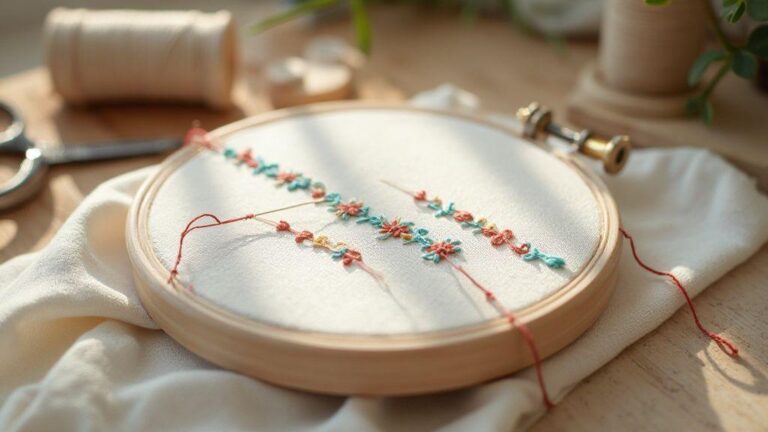
Trace with steady short strokes for clean lines
Paragraph 1: When you trace, use short, controlled strokes that stay inside the pattern lines. Short strokes help you keep your hand steady and your lines crisp. If you need to pause, lift your pencil or embroidery pen and set it back down at the same point to avoid stray marks. You’ll notice your lines look more precise as you maintain a light touch and consistent pressure.
Paragraph 2: Move slowly and breathe. Your goal is smooth, even lines that you can still see clearly against the fabric. If you see a stray line, erase gently or cover it with a tiny stitch later. You’ll build muscle memory for where to place your pen and how to keep your hand from shaking when the pattern gets complex.
Check alignment
Look over the whole pattern on the fabric and compare it to the original design. If a corner seems off, shift the fabric a bit and recheck. A small misalignment can throw off the whole project, so take a moment to make precise adjustments. You’ll thank yourself later when your embroidery sits perfectly.
Fix Common Problems When Tracing Patterns onto Fabric
Tracing patterns onto fabric can feel tricky at first, but you can fix most issues with simple tweaks. If your lines smudge, your pattern slips, or you can’t see the trace clearly, you’re not alone. You’ll benefit from using the right tools and a steady hand. Start by checking the fabric texture: smooth cotton or linen holds lines better than slick synthetics. When you trace, go slow and keep the tracing tool perpendicular to the fabric so lines stay even. If you see faint lines, switch to a darker marker or carbon pencil and retrace with light, steady strokes. Remember, the goal is a clean, visible guide that won’t smear as you work.
Another common problem is pattern shift when you move your fabric. Keep your area dry and clean, and tape the pattern to the fabric with gentle, non-adhesive clips that don’t leave sticky marks. If you notice the pattern bending or curling, lay the fabric flat and press it gently from the center outward with a soft iron on low heat. Finally, check your lighting. A bright, even light helps you see every line clearly and reduces the urge to press harder, which can distort the pattern. By keeping your workspace calm and your tools ready, you’ll trace with confidence.
If you’ve tried everything and still struggle, try a quick test on scrap fabric first. This lets you gauge pen pressure, line darkness, and whether the ink bleeds. Adjust your grip, your tool, or your angle based on what you see. With practice, you’ll find the rhythm that works for you and your chosen fabric.
Prevent smudges and faint lines with the right tools
Using the right tools makes all the difference when you trace. Start with a softer graphite pencil or a carbon transfer pen that marks without digging into the fabric. A light box or the Lightbox Method: Tracing Patterns onto Fabric Like a Pro can help you see lines clearly without pressing hard. Choose a pen with a fine tip so you don’t create bulky lines that will show through your stitches. Keep a few spare clips on hand to pin the pattern so it won’t shift while you work.
Your fabric deserves better than rubbing marks. Work with a clean, smooth surface; dust and lint can cling to ink and turn your perfect line into a smudge. If you’re using chalk, keep a brush nearby to gently sweep away excess powder after tracing. And don’t forget a reliable eraser for any stray marks you want to remove before stitching. With the right mix of light, grip, and stability, your lines stay crisp and easy to follow.
Stop pattern slip with clips and non-slip mats
Pattern slip is a nagging problem, but you can beat it with a few simple tools. Use clips that grip gently without tearing fabric, and place them at key points to hold the pattern in place. Pair clips with a non-slip mat under the fabric to stop it from sliding as you trace. If you’re working on a slippery surface, consider taping the edge of your pattern to the mat so it stays put while you trace.
Another trick is to keep your fabric taut but not stretched. Breathe and let your shoulders relax so your hand maintains a steady motion. If your pattern still shifts, re-check the pattern alignment before you begin stitching. When everything stays in place, you’ll see clean, accurate lines you can trust.
Test on scrap
Before you commit to your main fabric, test your tracing on a scrap piece. This test tells you if the lines are dark enough, if they smear, or if they ghost through to the other side after stitching. Adjust your tool pressure and line thickness based on the result. If you’re happy with the test, you’re ready to trace confidently on your project fabric.
Use Lightbox Tracing for Quilting and Embroidery Projects
When you start a quilting or embroidery project, a lightbox becomes your best friend. You’ll see your pattern clearly without tracing lines that smear or blur. With the light behind your fabric, you can align designs exactly where you want them. This helps you keep your stitches neat and your blocks uniform. You’ll feel more confident as you work, because every line you trace is a promise that your finished piece will look intentional, not rushed.
While you’re tracing, your hands should stay steady and relaxed. Place the pattern on the lightbox, then lay your fabric on top. If your fabric shifts, you can gently nudge it back into place without tearing or tearing out work. The Lightbox Method makes it easy to check your progress in real time, so you don’t get surprises later when you’re sewing blocks together. This is especially helpful for busy quilts with many identical blocks.
Using a lightbox also minimizes pencil marks on your fabric. You can trace with a fine, erasable pen or fabric pencil and then erase any stray lines later. When you finish tracing, you’ll have a clean guide to follow as you stitch. Your project will look crisp, and your time won’t be wasted redoing work that moved out of place.
Trace quilt blocks and seam lines accurately
A lightbox helps you line up each block with precision. You can place your quilt blocks on the lightbox and see where to align seams. This reduces puckering at the edges and makes your rows line up straight. You’ll notice how small misalignments become obvious on the light, so you can adjust before you sew. Accuracy here saves you from ripping out sections later.
When you trace seam lines, you create a reliable guide for stitching. You can mark where the top and bottom of a block meet another block, so your rows stay even. For beginners, this is especially helpful because it gives you a clear path to follow, not a guess. The simple act of tracing seam lines helps you develop a rhythm you can carry into every project.
If you’re worried about pen marks showing after washing, choose a washable fabric pen or pencil. You can erase or wash out these marks once your project is complete. The lightbox makes it easy to trace without pressing hard, so your fabric texture stays smooth and the stitches stay clean.
Transfer embroidery designs and stitch guides
Transferring designs is where a lightbox shines. You can place your pattern over your fabric and copy the exact lines you need. This means your embroidery will look balanced and your stitches will follow the intended path. As a beginner, you’ll gain confidence from seeing a complete outline before you start stitching.
A lightbox also helps you copy stitch guides accurately. If your pattern includes backstitches, satin stitches, or French knots, tracing the guide keeps you on track. You can mark where each stitch starts and ends, reducing mistakes and making your work faster in the long run. This is where you start to feel the ah-ha moment: your embroidery begins to flow.
If you’re using a complex design, you can break it into smaller parts on the lightbox. Transfer one section at a time, then move to the next. This approach keeps you from getting overwhelmed and helps you build muscle memory for the stitches you’ll use most.
Mark key points
Use the lightbox to mark key reference points on your fabric. Place marks at corners, centerlines, and seam intersections. These points act like anchors, helping you align blocks and stitches consistently. You’ll appreciate having clear landmarks when you’re working with multiple hoops or layers.

I’m Sophie Caldwell, the author behind granaboom.com, and I believe hand embroidery is one of the simplest, most relaxing ways to create something beautiful with your own hands. I started this blog to help beginners learn hand embroidery without feeling overwhelmed by complicated instructions or “perfect” results.
Here you’ll find beginner-friendly guides to decorative embroidery stitches, along with clear step-by-step practice ideas and patterns you can use to build confidence. My focus is on making the learning process easy: simple explanations, helpful stitch combinations, and small projects that look polished even when you’re just starting out.
Welcome to granaboom.com—grab your hoop, choose a few colors, and let’s stitch one line at a time.