Hand-Embroidered Bookmarks: A Quick Weekend Project
Materials for Hand-Embroidered Bookmarks
You’re starting a small, satisfying project, and the right materials make all the difference. Choose fabric that behaves well under a simple stitch—quiet, smooth textiles yield clean lines with fewer snags, so your designs read clearly. You’ll need threads that don’t fray or twist, plus sturdy tools that stay out of your way as you sew. When you pull these pieces together, hand-embroidered bookmarks come together faster than you expect and still look polished enough to gift or keep.
Material choices aren’t magic—it’s planning. You’ll use a base fabric, a light stabilizer, embroidery thread, needles, and a light frame or hoop to hold everything steady. Keep a small scissors, a sharp needle, and a fabric glue or fusible scraps for tiny fixes at the ready. With these basics in your kit, you can jump into a quick weekend project without hunting for supplies all over town. Your finished bookmark will feel sturdy and neat, like you bought it from a shop.
The key is matching fabric to your design. A light plain weave reads stitches cleanly and handles simple patterns well. Bold patterns can handle a bit more texture, but you’ll want a fabric that won’t shadow your work. When materials align, stitches sit crisp, colors stay true, and your bookmark lasts through many reads.
Best Fabric for DIY Fabric Bookmarks
The best fabric for DIY fabric bookmarks is a smooth, tightly woven cotton or cotton-blend. This texture lets each stitch stand out without catching on the weave, giving cleaner lines and less puckering. If you’re using simple backstitch or running stitch, this fabric keeps edges neat and colors bright.
If you want more body, consider cotton-linen blends. They hold shape and provide extra durability, which is handy for layers of decorative stitching or small appliqués. When you pick this option, keep tension steady and use a light stabilizer to prevent stretching. The result: a bookmark that feels sturdy in hand and looks professional.
Less ideal are very stretchy fabrics like jersey or knits unless you back them with a stabilizer. They can stretch as you stitch, distorting your design. If you’re curious to experiment, try a stabilized knit with a firm interfacing—just know success hinges on careful tension and a solid hoop grip.
Needles, Thread, and Stabilizer Choices
For needles, a sharp embroidery needle in a size around 7–9 works well for most lightweight fabrics. If the fabric is tougher, opt for a 5–6 to pierce through without skipping stitches. Keep a small seam ripper nearby, but you’ll likely only need a few careful pushes to place each stitch exactly where you want it.
Thread choice matters as much as needle size. For a classic look, use cotton embroidery floss in multiple strands. Three strands is a good starting point for most designs; you’ll get clean lines without overpowering the fabric. If you want a shinier finish, pearl cotton adds a subtle glow, but be mindful of its thickness.
Stabilizer helps your fabric stay flat and stitches stay even. A light tear-away stabilizer is great for thin cottons, giving you a clean edge after you finish. For stiffer fabric, you can skip stabilizer or use a lightweight fusible interfacing to prevent puckering. The right stabilizer makes your designs clearer and borders crisp, so your handiwork reads as deliberate.
Quick Materials Checklist
- Fabric: smooth cotton or cotton-blend, plain weave
- Stabilizer: light tear-away or fusible interfacing (as needed)
- Thread: cotton embroidery floss (3 strands) or pearl cotton for shine
- Needle: embroidery needle size 7–9 (or 5–6 for tougher fabrics)
- Hoop or frame to hold fabric taut
- Scissors, needle threader (optional), fabric chalk or erasable pen
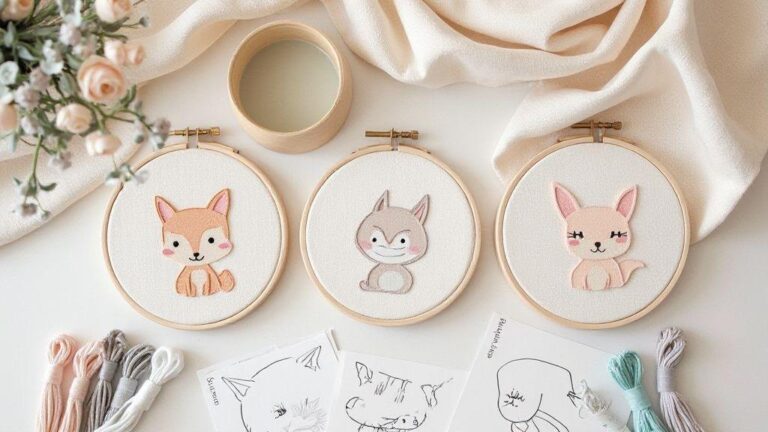
Embroidery Stitches for Bookmarks
Embroidery bookmarks are a tiny, joyful weekend project. You’ll use basic stitches to create patterns that sit proudly between your book pages. These stitches aren’t just decorative; they help you practice control and thread texture. Think of them as small, satisfying puzzles you can carry with you for a few peaceful minutes each day. When you finish, you’ll have a practical keepsake you can hand to a friend or gift to yourself.
The beauty of bookmarks is you don’t need fancy fabrics or tools. A small piece of cotton or linen, a sharp needle, and a few threads give you endless options. You’ll learn how different stitches behave on light versus dark fabrics, and you’ll notice tension and precision improve with every repeat. With the right stitches, Hand-Embroidered Bookmarks: A Quick Weekend Project becomes not just a page marker but a tiny piece of art you carry in your book bag.
If you want to turn your stitches into a pattern, start with simple shapes like lines, dots, or small leaves. Use bold colors for contrast or soft tones for a delicate look. You’ll be surprised at how satisfying it feels to finish a design that sits perfectly between pages, ready to mark your next reading session.
Backstitch and Running Stitch Basics
Backstitch is your go-to for crisp lines: pull a thread forward, then stitch backward to create a continuous line. It’s clean, steady work, and once you get the rhythm, straight edges appear with ease. Running stitch is a relaxed companion—fast, even stitches that ride along the fabric. It’s great for outlines or subtle textures. Together, they give you control: backstitch for definition, running stitch for speed and texture.
Practice starts with a simple straight line on scrap fabric. Notice how even tension matters; pull too hard and your line curls, too loose and it looks airy. Keep stitches small and evenly spaced, and your line looks professional. If you’re timid about crossing threads, begin with parallel rows of running stitches then weave in a backstitch for a sharp edge. Before you know it, your design will have clean, confident lines.
When you combine backstitch and running stitch, you can create borders or simple patterns that stand out on light fabric. Choose a contrasting color for the outline to make the design pop.
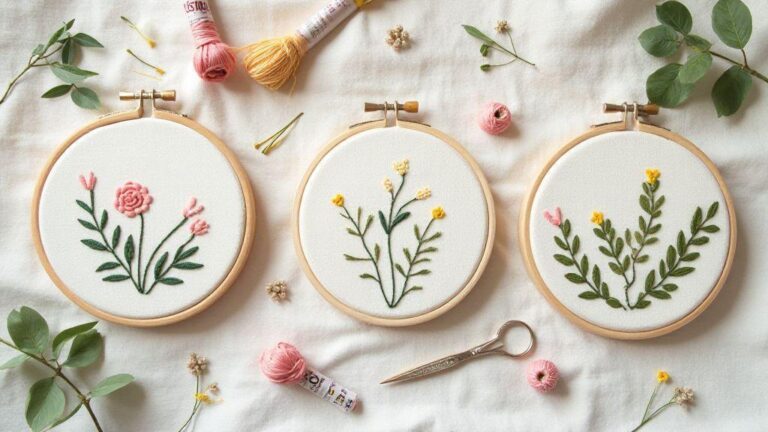
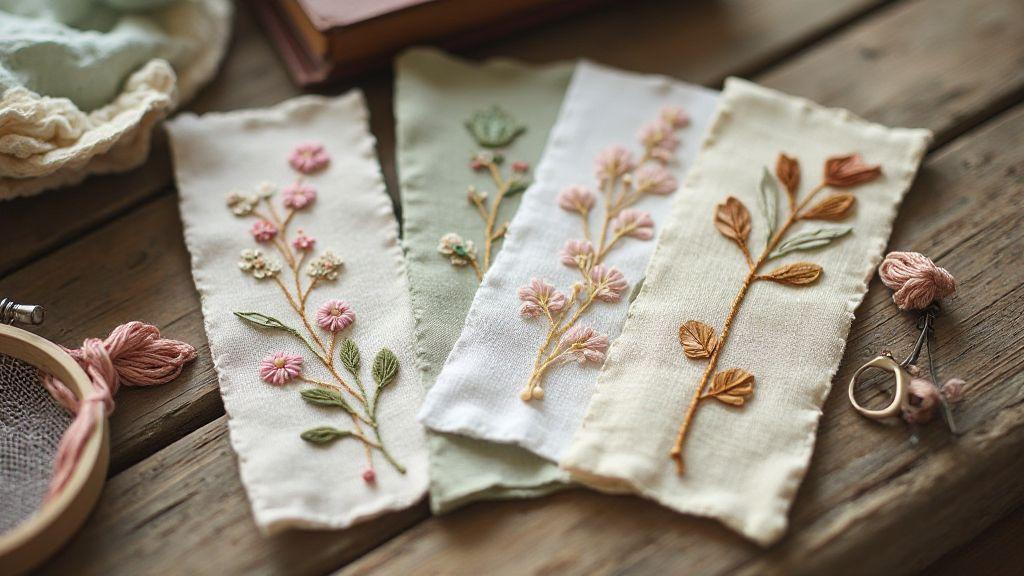
Satin Stitch and French Knot Uses
Satin stitch fills areas with a smooth, solid color. Stitch in long, close lines to cover the fabric and create a block of color—perfect for leaves, petals, or any filled shapes. French knots add tiny decorative dots that look like seeds or stars. They’re a cute way to add texture without taking over the design. Together, satin stitch and French knots build dimension and interest.
For satin stitch, keep stitches even and close. Start at one edge and move in the same direction to avoid gaps. French knots require a steady hand and a light touch; wrap the thread around the needle once, hold the fabric taut, and pull through to form a small knot. If your knot sits uneven, adjust tension and try again.
To use them in a project, outline a shape with running stitch, fill with satin stitch, and sprinkle in a few French knots for texture. Create tiny flowers, border dots, or a central motif to draw the eye.
Simple Stitch Practice Guide
Grab scrap fabric and three colors. Do a short backstitch line, then a parallel running stitch line beside it. Switch to satin stitch to fill a small leaf, and add several French knots for texture. Repetition helps stitches stay steadier and color choices make more sense. Outline with backstitch, fill with satin stitch, and add a few French knots for dots. This tiny exercise builds balance between line work and filled areas.
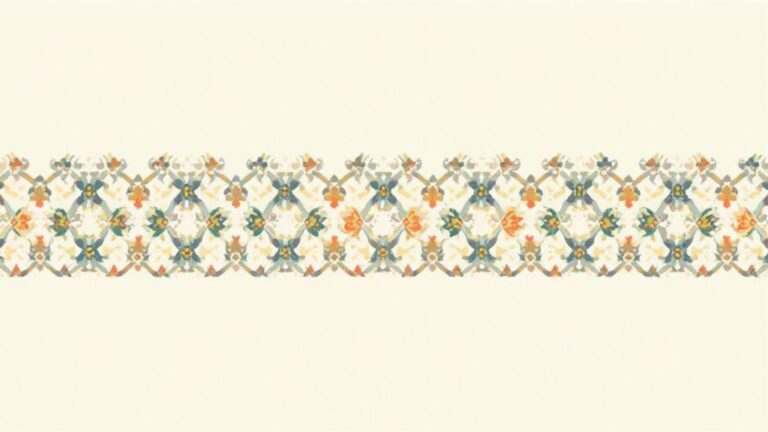
Simple Hand Embroidery Patterns and Templates
You’re about to discover patterns you can finish in a party-long session or a cozy afternoon at home. These simple templates keep you moving, even if you’re just starting out with hand embroidery. You’ll find easy shapes and clear guides that keep stitches neat. With these templates, you’ll gain confidence fast and see your work improve with every line you sew. Think of them as friendly building blocks you can reuse on many projects.
Using these patterns, you’ll learn how to transfer designs cleanly onto fabric, keep stitches steady, and adjust size for different projects. The templates are versatile: copy them, resize, or mix elements from several patterns. As you practice, your hands become steadier and your eye for spacing sharper. These are the wins that make you want to pick up the hoop again tomorrow.
When you finish a simple pattern, you’ll feel that satisfying rush you get after tying off a thread with a tidy knot. That momentum makes you try something a touch more complex next time. Keep these templates handy so you can jump in whenever you have a spare quarter-hour, and watch how your embroidery skills grow without pressure.
Scale Patterns for Narrow Bookmarks
Begin by shrinking a basic motif to fit a slim bookmark—my favorite way to practice. Scaling helps you learn how proportion stays right even on a skinnier canvas. Keep it simple: a single flower, a small heart, or a tiny initial. Measure the bookmark length first, then adjust the design to fit with comfortable margins.
Test the scaled design on scrap fabric before committing to the bookmark. If a line feels crowded, nudge the design to breathe a bit more. Small tweaks—like widening the space between stitches or lowering the motif—make the finished piece look intentional, not cramped.
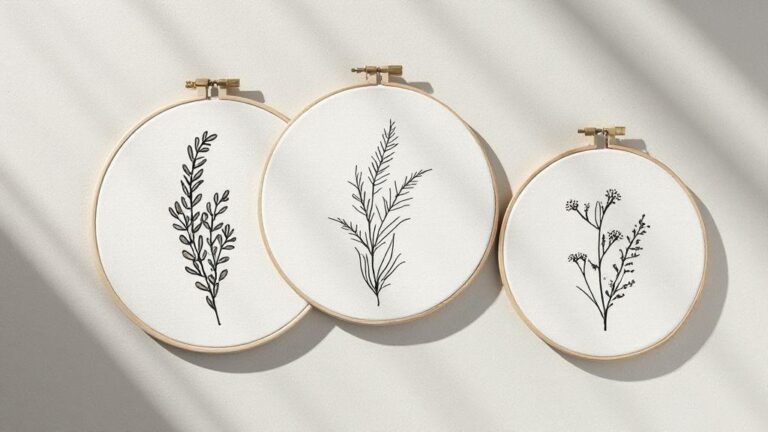
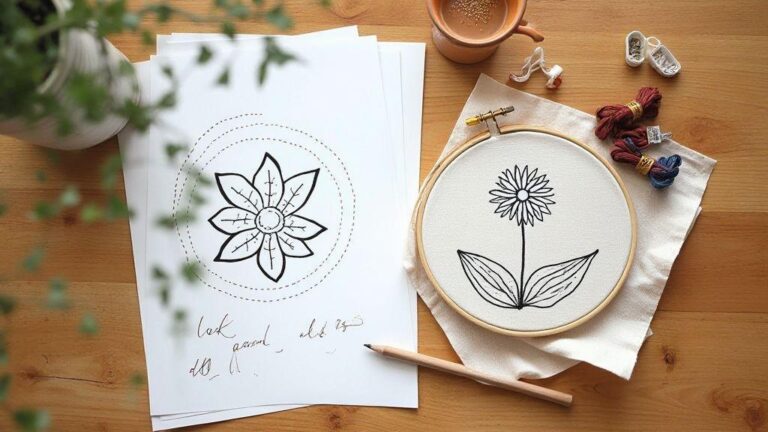
Easy Floral and Letter Templates
Floral motifs and simple letters are perfect for practice and practical projects. Choose a single bloom, a couple of leaves, or a friendly cursive initial for a greeting card or stitched tag. Start with a light pencil outline or tracing paper to copy the template onto fabric, then switch to split stitch or backstitch to bring lines to life. Keeping threads snug and transitions smooth makes even a small design feel polished.
If you want to mix flowers with initials, place one focal bloom beside a letter you care about. This teaches balance between detail and readability. Keep stitches consistent in both elements for a cohesive look. This practice translates to larger projects later, like embroidery on a tote or a pillow.
Template Placement Guide
Place your template where you want the center of attention, then mark the fabric lightly. Centering helps the final piece look intentional and even, especially if you sew a border or frame. Align the design with the weave so stitches sit neatly along the threads. A quick ruler check ensures your design stays straight, making spacing and stitches easier to manage.
Step-by-Step Embroidery Bookmark Tutorial
Embroidery bookmarks are a delightful calm you can finish in a weekend. You’ll learn the feel of the needle, the rhythm of the stitches, and how a few simple steps become a polished, usable piece. Let’s keep things simple: you’ll get a quick win, then you’ll want to make more.
Start with a clear plan and a few essential tools. Choose easy fabric, a snug hoop, and a simple transfer design to set you up for success. As you work, you’ll notice how the fabric behaves—how it grips the thread and how the hoop keeps everything flat. This tutorial is designed so you can follow along without guesswork, and you’ll feel confident stitching from start to finish. By the end, you’ll see how tiny stitches become a neat, ready-to-use bookmark you’re proud to show off, and you’ll know you can tackle more patterns next weekend.
You’ll discover that the magic is in the flow: prep, stitch, finish. Each part builds on the last, so you’re not left with tangled threads or wonky lines. If you’re new, you’ll finish with a crisp edge and a design that looks clean from a few feet away. If you’ve stitched before, you’ll appreciate how a simple step sequence helps you keep your place and your tension steady, making the process feel almost meditative. Hand-Embroidered Bookmarks: A Quick Weekend Project can become a regular craft habit once you see how straightforward it is.
Prep Fabric, Hoop, and Transfer Design
Choose a light, tight weave like linen or cotton for clean stitches. Cut a rectangle larger than your bookmark goal, leaving room to turn and finish. Place the fabric in a sturdy, low-tilt hoop so it stays taut. Pick a simple transfer design and print it in a size that fits your paper bookmark. Trace with a disappearing pen or use a lightbox to transfer the design. A clear guide reduces mis-stitches, keeping lines crisp.
Secure your needle, thread, and scissors within easy reach. Thread a single color or two contrasting threads for a bold look. If you’re new, start with one color and a backstitch for a clean outline. That choice makes it easy to fix small slips. As you prepare, you’ll feel ready to stitch because everything you need is in reach, and the hoop keeps fabric flat.
Stitch Order for a Neat Finish
Begin with a simple outline to anchor the shape. A backstitch or split stitch works well for clean lines and is forgiving if the fabric shifts. Stitch along the outer edges first so the inside remains neat. Then fill larger areas with satin stitch or a few long stitches in parallel. Don’t rush—the rhythm of steady, even tension matters most for a tidy finish. If you see a blob or wobble, pause, adjust, and continue. Your confidence grows as edges stay sharp and the interior fills smoothly.
Keep thread lengths short to avoid tangles. Re-thread as needed and secure loose ends with a small knot on the back. Flip the piece only when the front looks clean. Finally, add tiny finishing touches—dots, leaves, or a tiny stem—so your bookmark feels complete.
Finish and Trim Guide
When stitching is done, remove the fabric from the hoop carefully. Snip loose ends, leaving a tiny tail to anchor from the back. Secure stray threads beneath the stitches with a fine needle. Press the bookmark gently from the back with a warm iron to set stitches, avoiding flattening them. Add a backing for a sturdier feel—felt is quick and light—and stitch around the edges for a clean border.
Trim to final size, leaving a small margin for shifting. For a finished edge, bind sides with a simple running stitch or a thin satin stitch. Attach a ribbon or corner charm for extra charm. Your Hand-Embroidered Bookmarks: A Quick Weekend Project is ready to tuck into a book or gift to a friend.
Quick Weekend Craft and Portable Project Tips
You want to finish a fun project without dragging a ton of gear. These tips keep supplies light and momentum steady. Think of this as your go-to playbook for quick wins that fit into a busy weekend.
First, keep tools modest: a small pair of scissors, a needle, thread, and a few portable fabrics or papers. Second, choose projects that scale up or down: start small and add details if you have extra time. Third, plan for clean breaks between sessions—end each session with visible progress. With these ideas, weekend crafts stay enjoyable and frustration-free.
Break the Project into Short Sessions
Breaking a project into short sessions prevents burnout and keeps your eyes fresh. List tiny tasks: gather supplies, prepare workspace, complete one stitching section, and tidy up. Set a timer for 20–30 minutes and focus on one concrete task. After the timer, pause, stretch, and sip something you enjoy. If stuck, switch to a lighter step—tracing a pattern or cutting shapes. The goal is rhythm, not speed. You’ll be surprised how quickly progress adds up when you respect your rhythm and stop before fatigue hits.
Keep a visible progress map, even a tiny checklist near your workspace. Each checked item boosts confidence and signals progress, helping you avoid cramming too much into one long session.
Build a Small Portable Craft Kit
A compact kit makes weekend projects predictable and easy to start anywhere. Include a few needles, a small spool of thread, scissors, a thimble, paper or fabric scraps, and a small ruler. Add a tiny note with a quick pattern or template so you can jump in when you have spare minutes.
Pack smart: use a slim pouch or a small box with dividers. Put pattern cards in a protective sleeve and keep a couple of favorite tools in easy reach. Your kit becomes a confidence booster—no more hunting for supplies when inspiration strikes. The right kit lets you pull out and go, turning any idle moment into a satisfying craft session.
Weekend Timeline Plan
Create a simple, repeatable weekend timeline to stay focused without feeling rushed. Morning: gather supplies and lay out the plan. Midday: complete the main skill task, like stitching or cutting and assembling. Afternoon: add finishing touches and tidy your space. This rhythm helps your brain stay fresh and your hands steady.
Adjust the plan to your pace. If you’re enjoying a project, extend a session by 10–15 minutes; if you’re tired, shorten it and resume later with a quick review. The aim is a clear, repeatable flow that fits into your weekend. Your hands will thank you for the steady, manageable plan.
Care, Personalization, and Gifting Ideas
Careful handling, personalization, and thoughtful gifting elevate handmade book accessories from craft to keepsake. A simple routine protects materials and colors, while personal touches make gifts feel special. The warmth of your creativity shows in sturdy stitching and small details like names or initials.
First, choose materials that wear well: sturdy threads, breathable fabrics, and low-sheen finishes. A quick routine—gentle wipe, soft brush for dust, and dry storage away from direct sun—preserves colors and keeps pieces looking fresh. Consistency in care equals longevity and happier gifting days.
Personalization can be as simple as adding a name or initials, or as thoughtful as choosing colors that match a favorite book. Include a tiny note on the back, or a year that marks a meaningful read. The result is a piece that feels custom, not crowded. Personalized touches turn a bookmark into a story you give with love.
Wash and Care for Handmade Book Accessories
Gentle care helps your pieces last. Use mild soap and warm water for surface cleaning, then lay flat to dry. Avoid soaking, which can loosen stitches. For metallic threads or delicate beading, handle with a soft cloth and skip abrasive cleaners. A quick, light maintenance routine every few weeks keeps colors bright longer.
For fabric bookmarks, a light hand wash works best. Rinse thoroughly to remove soap, then press with a cool iron only if needed. If you use embroidery, a quick steam from a distance can release wrinkles without flattening stitches. Store bookmarks flat or rolled in a soft cloth—never crammed in a box. Your future self will thank you.
For leather or cork accents, wipe with a damp cloth and dry immediately. Avoid soaking leather. If you seal edges, use a leather-safe conditioner sparingly. Treat metal findings with a gentle wipe to prevent tarnish. These details keep texture and color from fading with use.
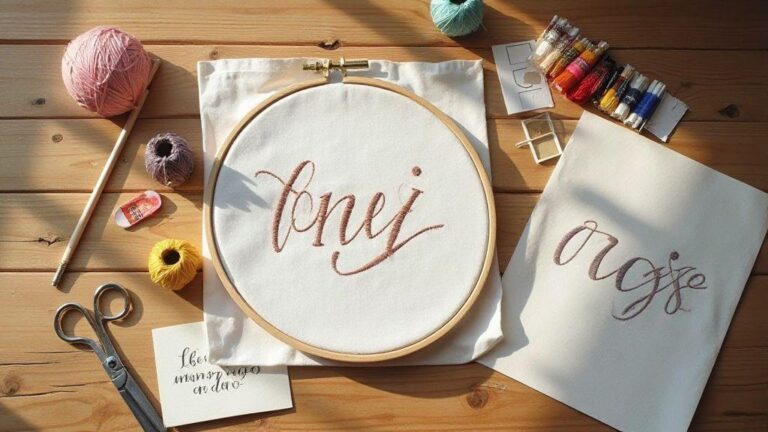
Add Names for Personalized Embroidered Bookmarks
Personalizing an embroidered bookmark is like adding a signature stroke to a painting. Start with a clear plan: choose thread colors that match the recipient’s vibe, then lay out initials or a full name in a legible font. You can tuck the name into a small border or weave it along a ribbon edge for a delicate, readable touch. When spacing is right, the result feels custom without crowding. The reader will notice your care every time they open the book.
If you’re stitching by hand, practice on scrap fabric to nail letter shapes and alignment. For machine embroidery, test settings on a sample. A clean back is essential—secure threads, minimal knots, and a neat finish prevent snagging on pages. The goal is to be proud of your work and for the recipient to feel special every time they reach for that bookmark.
Presentation and Packaging Ideas
Presentation can be simple or fancy, but it should protect the item and hint at the care inside. Consider a small cotton pouch with a color-matched thread tied in a bow. A thin kraft card with a short note adds warmth, especially if you include a line about why you chose the design. If you opt for a box, nestle the bookmark in tissue paper and add a reusable tag. Packaging is part of the gift—let it tell a story of handmade effort.
For an extra personal touch, include a short care card and a suggested weekend project idea, like Hand-Embroidered Bookmarks: A Quick Weekend Project. This helps the recipient see how easy it is to keep the piece looking its best and invites them to try a simple project themselves. Bold presentation invites delight, and your care extends beyond the item itself.
Hand-Embroidered Bookmarks: A Quick Weekend Project is a friendly, portable craft that fits neatly into a weekend. This approach keeps you focused, steadily builds your stitching skills, and leaves you with a usable, gift-worthy keepsake. Whether you’re new to embroidery or brushing up your technique, these steps and templates help you finish with confidence—and you’ll likely want to make more as the joy of this quick weekend project continues.

I’m Sophie Caldwell, the author behind granaboom.com, and I believe hand embroidery is one of the simplest, most relaxing ways to create something beautiful with your own hands. I started this blog to help beginners learn hand embroidery without feeling overwhelmed by complicated instructions or “perfect” results.
Here you’ll find beginner-friendly guides to decorative embroidery stitches, along with clear step-by-step practice ideas and patterns you can use to build confidence. My focus is on making the learning process easy: simple explanations, helpful stitch combinations, and small projects that look polished even when you’re just starting out.
Welcome to granaboom.com—grab your hoop, choose a few colors, and let’s stitch one line at a time.