Colonial Knot vs French Knot — What’s the Real Difference?
Colonial Knot vs French Knot — What’s the Real Difference?
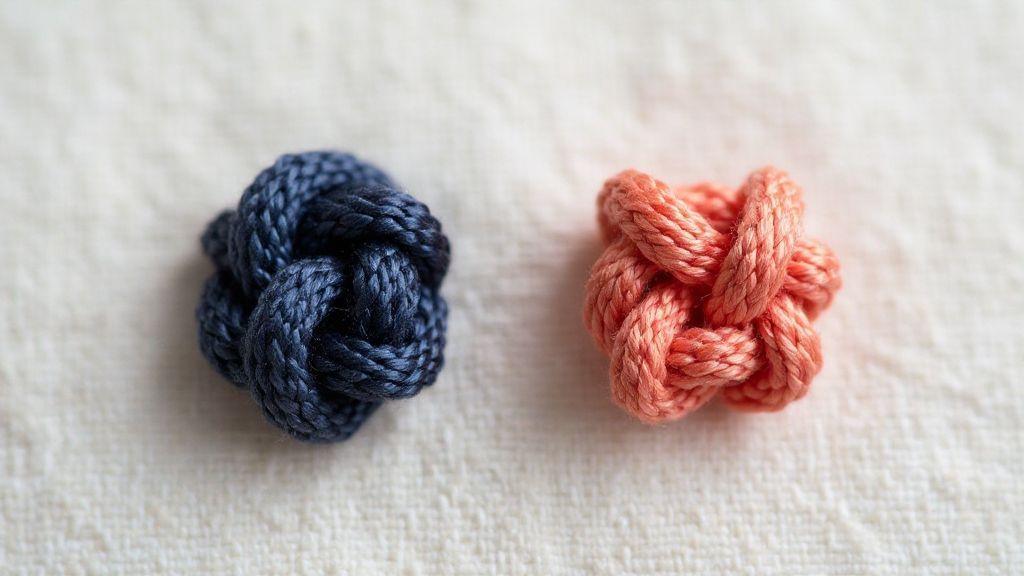
You want to know which decorative stitch fits your project, so let’s cut to the chase: Colonial Knot and French Knot both add texture, but they read differently on fabric and in mood. The Colonial Knot is sturdy, bold, and quick to make, giving a chunky, rustic look. The French Knot is delicate, tiny, and elegant, perfect for shading and fine details. When choosing between them, consider how much drama you want, how sturdy your fabric is, and how much time you’re willing to spend. They can run on the same piece, but they read very differently. For folk-inspired decor, Colonial Knot can carry the design; for subtle quilting or embroidery, French Knot shines without shouting.
- Slightly thicker thread for Colonial Knot; finer for French Knot.
- Needle size helps set the stage: a bigger needle makes Colonial Knot easier and faster; a finer needle keeps French Knot neat.
- Practice on a scrap swatch first to feel the tension and see how the fabric takes each knot.
- Colonial Knot sits proud, like a bead on a string; French Knot sits tucked into the weave, with quiet impact.
- Your choice affects the whole project’s read, from wall hangings to pocket squares.
In the end, choose based on texture, speed, and feel. If you want bold texture and quicker coverage, pick the Colonial Knot. If you want subtle shading and a refined touch, choose the French Knot. Remember the key difference: mass and mood. Your project will guide you, and you’ll feel confident switching between them as designs evolve.
French knot wrap method
Your first step is to anchor the thread securely, then wrap the thread around the needle a few times before inserting it back into the fabric. The wrap creates a tiny, pointed coil that becomes the knot when pulled tight. This method yields a clean, compact dot that sits in the fabric rather than on top of it. On smooth or tightly woven fabric, the wrap stays neat and uniform, making it ideal for tiny highlights or delicate outlines. Keep the wraps close to the surface and pull straight up to avoid skew.
Choose a floss or thread with a little sheen; it catches light and makes the French Knot pop without looking busy. Hold the needle steady and rotate your work slowly. If the thread slips, re-anchor and start again rather than forcing the knot, or it will look loose. With practice, you’ll get consistent sizes across your design for a polished finish that feels painterly.
Experiment by varying knot size: three, four, or five wraps change the knot’s size. More wraps create a plumper knot, perfect for petals or tiny buds. For shading, layer French Knots of different sizes and heights to mimic a soft gradient. This adds depth without bulk.
- Wrap the thread on the needle 1–3 times
- Practice 1: 1 wrap = subtle dot; 2 wraps = bolder; 3 wraps = pronounced center.
- Practice 2: Keep wraps neat and close to the needle shaft.
- Hold tension and insert near the entry point
- Practice 3: After wrapping, hold wraps firmly as you guide the needle back to the entry.
- Practice 4: If a thread loop forms behind the knot, loosen and redraw through.
French knot tutorial tricks
- Tip 1: Keep the thread short enough to control.
- Tip 2: Use a thimble or finger protectors on stiff fabric.
- Tip 3: For dense fabric, place the needle just under the surface and pull slowly.
- Tip 4: If the fabric has a nap, brush lightly after finishing to even out the surface and reveal true knot color.
- Tip 5: As you experiment, compare Colonial Knot vs French Knot — What’s the Real Difference? You’ll notice the French knot focuses on a single, tiny raised dot, while some variations pull the thread to create different textures.
Colonial knot loop method
Start by threading your needle and securing a tiny tail, then bring the needle up to the fabric’s surface. Rather than wrapping tightly around the needle, loop the thread once or twice and push the needle back through near the base of the loop. This creates a chunky, rounded knot that sits higher than the fabric, giving bold texture. The loop method is forgiving on imperfect tension and works well on medium to heavier fabrics where a standard knot might flatten. It’s ideal when you want a visible dot that reads as a stitch cluster from a distance.
For clean results, keep the needle moving in a small, consistent arc as you form each loop. If loops become uneven, pause, re-anchor, and reset. Maintain even spacing between knots so the pattern reads clearly rather than as random speckling. One knot, one loop, repeat.
When combining Colonial Knots with other stitches, the loop method can anchor bold zones or create a border that stands apart from finer details. It’s great for samplers or rustic quilts, offering tactile contrast that invites touch. The loops hold their shape on fabric that gets handled a lot, more reliably than many small stitches.
How to do Colonial Knot step-by-step
This technique adds a neat, textured line to embroidery or decorative stitching. The knot sits snug against the fabric, giving a tidy, dimensional look. Practice on scrap first, then transfer the rhythm to your project. Stay relaxed, keep tension steady, and let the needle guide you through a clean sequence that locks the knot in place.
- Prepare your needle and thread, bringing the thread to the fabric’s front for an upward pull.
- Create a small loop; hold the base with your thumb. The loop should be just big enough to slip the needle through comfortably.
- Secure the loop and pull to finish the stitch. The knot forms at the base with two legs neatly side by side. Keep a steady grip and tug gently to avoid snagging. Snip the tail close to the knot and ensure the stitch sits flat and even.
Colonial knot tutorial tips
- Keep your tension consistent across knots; adjust if one sits high.
- Practice on scrap to build steadiness.
- Compare results by viewing stitches from a slight angle to catch lopsided knots.
- Use contrasting thread in practice, then switch to project colors.
- Mind the fabric type; a tighter weave holds knots better for smoother technique.
How to do French knot in simple steps (condensed)
You’ll learn a classic decorative stitch that adds tiny, bold dots. The rhythm is wrap, anchor, pull. Start with a clean hoop and a fresh needle, choosing thread that sits nicely on the surface.
- Prepare your thread and position the needle near the target spot, keeping the thread taut but relaxed enough to move.
- On a scrap, test a tiny stitch to feel the thread’s behavior.
- Wrap the thread around the needle 1–3 times, hold wraps steady, and insert the needle back near the entry point. Pull gently to form a compact dot that sits flush with the fabric.
Wrap size basics:
- Practice 1: 1 wrap for subtlety; 2 wraps for more presence; 3 wraps for pronounced centers.
- Practice 2: Keep wraps neat and close to the needle.
- Hold tension and insert near the entry point; aim for a compact dot on the surface.
- If a loop forms behind the knot, loosen and redraw through.
French knot tricks
- Keep threads short for control.
- Use a thimble on stiff fabric; push gently to nestle the knot into place.
- On dense fabric, pull slowly to anchor without lifting fibers.
- For nap fabrics, brush lightly after finishing.
- Compare Colonial Knot vs French Knot — What’s the Real Difference? The French knot yields a single, raised dot; variations can create different textures.
When to choose each knot for your project
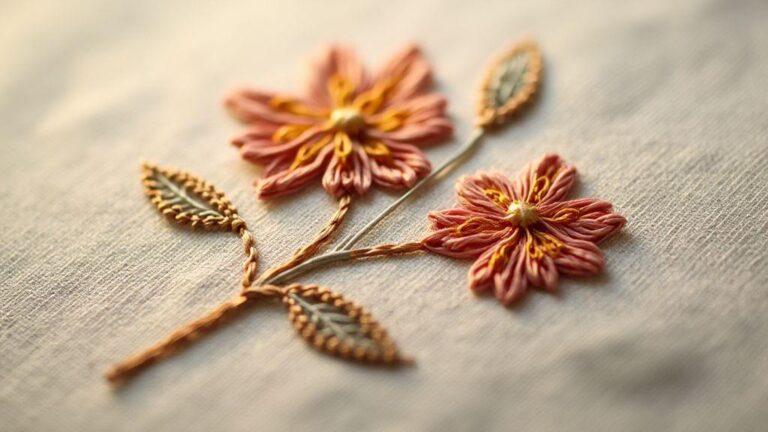
Choose based on fabric feel and the intended look. Colonial Knot offers subtle texture without overpowering the design; its raised ridge reads softly on linen or cotton. French Knot provides small, raised dots that pop, ideal for faux embroidery flowers or dot motifs, especially on dark fabrics. You can balance both: use French Knots as bright centers and Colonial Knots to frame them, creating depth without clutter. Test stitches on a fabric swatch to judge how each knot behaves with your fiber and weave. If the project will see movement or wear, consider durability: Colonial Knots stay compact and sturdy, while French Knots can loosen with stretch if tension isn’t balanced.
Best uses for Colonial Knot vs French Knot
- Colonial Knot: great for a raised, tidy line; outlines, borders, or decorative ridges on lightweight fabrics. Heirloom pieces benefit from its gentle traditional feel.
- French Knot: ideal for tiny punctate highlights, beads-like dots, or center accents. On dark fabrics or felt, the knot’s pop is more pronounced.
For combination designs, place French Knots as centers or accents and anchor with Colonial Knots for a soft contrast. This mix creates depth without crowding.
Difference between Colonial Knot and French Knot for texture
Colonial Knots deliver a textured line that’s steady and uniform, a raised but restrained look. French Knots provide tiny, distinct dots that catch light and stand out. For texture that stays under control, choose Colonial Knots for lines and ridges; for defined points that draw the eye, use French Knots.
Choose knot by fabric and thread
Match knots to fabric weight and thread thickness. For light cottons and linens, Colonial Knots give gentle texture without stressing the weave. For heavier floss or embroidery threads, Colonial Knot adds a modest bump without bulk. On wool felt or similar heavy fabrics, a French Knot can be a focal dot, especially on flat surfaces.
In synthetic blends with sheen, French Knot can catch light but secure the knot to prevent loosening. Silky fabrics pair well with Colonial Knot to reduce snagging. Balance the texture with fabric behavior to achieve the desired look and durability.
Tools and thread for Colonial Knot technique
Choose tools that feel steady and precise. A lightweight hand needle with a smooth eye helps thread glide. A thimble is handy for tight pulls. Use a mid-weight thread for crisp knots that don’t bulk. Keep a small scissors handy and a pin cushion or magnetic tray for organization. Start on scrap fabric to learn how your needle and thread behave together, spotting trouble spots before they appear on your final piece. The right tools boost confidence when moving from simple stitches to the Colonial Knot.
For Colonial Knot work, a medium-weight thread with a sharp or embroidery needle provides crisp, controlled knots that stay put. A slightly firmer grip helps on busy fabrics. The tool set should feel deliberate, not rushed, to achieve the classic, tidy look.
For French Knot work, opt for a finer thread and a smaller needle to keep the knot compact and neat. If knots flatten, try a sharper needle or a thread with more grip. Small tool adjustments yield a big difference in the final look.
Embroidered knot comparison: speed, size, and look
Speed, size, and look matter as much as the design. Colonial Knot typically sits flatter and longer along the fabric, while French Knot can puff if pulled tight. For a tight row of dots, Colonial Knot often yields smooth, uniform results. For dotted accents with more body, French Knot provides a lively, bead-like dot. Test both on scrap fabric to choose the rhythm that matches your design’s spacing and your stitching pace.
- Which knot is faster and more consistent? Colonial Knot tends to feel faster for long lines of tiny dots due to fewer wraps and less tension management.
- Which knot makes larger or tighter dots? Colonial Knot yields tighter, flatter dots; French Knot can produce larger, puffier dots with careful wrapping and tension.
- Compare finish and durability: Colonial Knot offers a smoother, flatter finish on low-pile fabrics; French Knot adds dimension and can trap lint but provides distinctive texture when evenly wrapped.
Your design will guide the tension and size you use. Practice on scrap with both knots side by side to quickly see which one your hand trusts for speed, size, and look.

I’m Sophie Caldwell, the author behind granaboom.com, and I believe hand embroidery is one of the simplest, most relaxing ways to create something beautiful with your own hands. I started this blog to help beginners learn hand embroidery without feeling overwhelmed by complicated instructions or “perfect” results.
Here you’ll find beginner-friendly guides to decorative embroidery stitches, along with clear step-by-step practice ideas and patterns you can use to build confidence. My focus is on making the learning process easy: simple explanations, helpful stitch combinations, and small projects that look polished even when you’re just starting out.
Welcome to granaboom.com—grab your hoop, choose a few colors, and let’s stitch one line at a time.