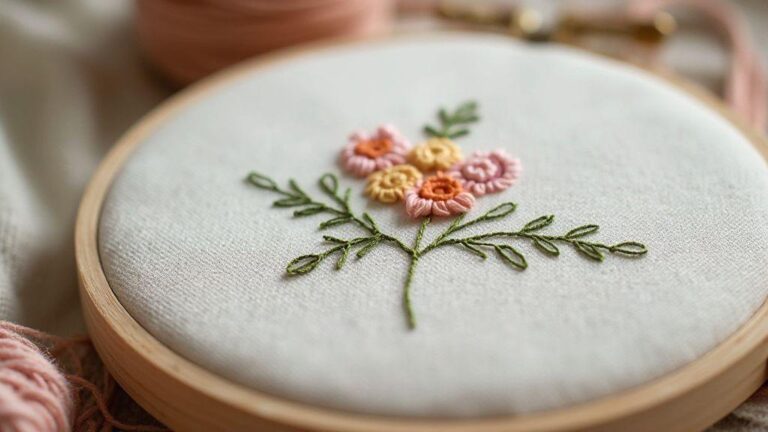
Woven Wheel Stitch: The Easiest Way to Embroider a Full Rose
Why you should use Woven Wheel Stitch: The Easiest Way to Embroider a Full Rose
You can build a full rose quickly with this stitch. It delivers bold, dimensional petals without fiddling with loose threads or tangled floss. The petals form flat yet full shapes, making it ideal for a range of fabrics—from totes to lightweight jackets—without needing fancy tools. As you practice, the wheel guides thread into curved, petal‑like lines, so each wrap sits neatly beside the last. It’s a smooth progression that builds texture with every pass, yielding a cohesive bouquet rather than a patchwork of stitches. This stitch translates well to other floral shapes, giving clean lines and consistent coverage for a sturdy finish. Simple enough for beginners and reliable for seasoned stitchers, it becomes your go‑to for petals, leaves, or spirals.
If you’re dialing up your embroidery game, this is a smart place to start. The Woven Wheel Stitch translates to a variety of floral forms, helping you branch out once you master the full rose. You’ll achieve precise lines and even coverage, so your finished piece wears or displays well. The method blends speed with a delicate, floral finish, and you’ll feel confident sharing your work.
How the stitch builds petal texture
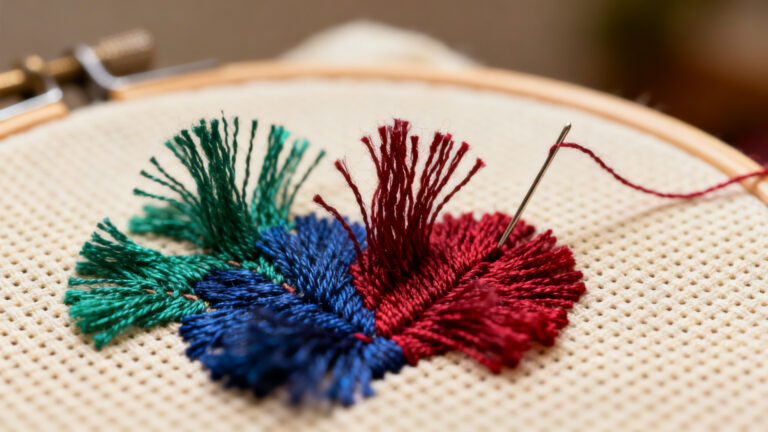
The stitch layers curved threads in a wheel‑like pattern, mirroring the natural curve of petal edges. Each wrap follows the previous, creating a subtle ridge that catches light and adds depth. Toward the center, the tension tightens, so petals fold organically rather than sitting flat. This build‑out gives your rose a three‑dimensional feel without extra stitches. Varying tension and stitch width changes texture: looser wraps yield soft, rounded edges, while firmer wraps push the petal shape outward for a bolder look. The result is a rose that pops from the fabric, like you could almost touch it.
Materials you need for success
You’ll need a few basics for a clean Woven Wheel Stitch: The Easiest Way to Embroider a Full Rose. Choose a smooth fabric that takes embroidery without puckering, and select floss or perle cotton in colors that match or complement your design. A compact embroidery hoop keeps the area taut and stitches even. Use a short, sharp needle for easier passes through the fabric, and pick thread with consistent thickness so the wheel sits evenly. To keep things neat, choose thread that won’t fade easily. If shading with multiple colors, plan your palette in advance for natural transitions. Keep a small pair of scissors and a needle threader handy for trimming or threading in tight spots. With these supplies, you’re ready to craft a graceful, full rose.
Quick supplies checklist
- Fabric that holds stitches well
- Embroidery hoop or frame
- Short, sharp embroidery needle
- Floss or perle cotton in chosen colors
- Scissors and needle threader
Step-by-step woven wheel stitch tutorial
The Woven Wheel Stitch is a beautiful way to add texture and motion to your embroidery. You’ll see petals, spokes, and tiny flowers emerge from simple lines as you work. This practical tutorial guides you through rhythm, grip, and small adjustments that turn plain fabric into a glowing design. The technique is forgiving when you pace yourself and keep threads taut but not strained.
- Preparing your fabric and hoop
- Making the foundation spokes
- Start the woven wheel stitch
- Shaping petals and layers
- Controlling spoke length and layering for a full look
- Finishing the center
Preparing your fabric and hoop
Mount your fabric in the hoop so it sits taut but not stretched. Choose a fabric that takes embroidery well—soft cotton or linen works best for beginners. Secure the hoop and mark a small center dot where your wheel will spin. Use a light erasable pencil or fabric‑safe chalk for guidance. Pick a smooth thread with a bit of sheen for visibility, and select a needle that glides easily through the fabric. Thread the needle with a clean tail and a short end to anchor later. Place a small stopper knot to prevent tangling as you begin. Set the fabric flat and find your rhythm.
Making the foundation spokes
Draw two or three light spokes from the center outward to guide warp alignment. Space them evenly for symmetry and cleaner crossings later. If your fabric has a grain, align spokes to it. Lay the first row of stitches along these spokes by bringing the needle up at the center and down along the spokes to create a weaveable structure. Check tension so stitches lie flat—too tight warps the wheel, too loose looks sloppy. Adjust with gentle pulls and relaxed hands. When the base feels right, you’re ready to start weaving.
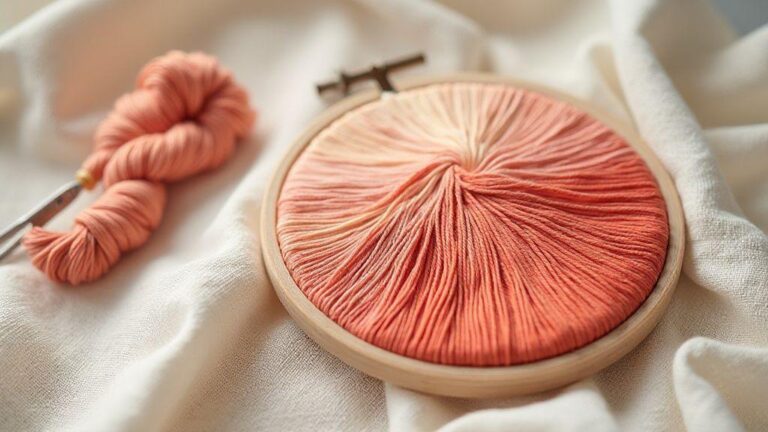
Start the woven wheel stitch
Weave by crossing threads around the spokes in a controlled rhythm. Bring the thread up near a spoke, cross over to the adjacent spoke, and pull snug so the crossing stays tight but comfortable. Continue around the wheel, keeping each crossing even and visible. Maintain a consistent angle and spacing as you move outward from the center. A steady pace yields a balanced wheel with a soft, dome‑like lift. As you finish each ring, the threads interlock like tiny spokes supporting a wheel. If a crossing is off, lift and re-seat it with a small adjustment. Your goal is a smooth surface with evenly spaced lines. With practice, your hands move more automatically, keeping stitches even without constant tightening.
How to do woven wheel stitch rose: shape petals and layers
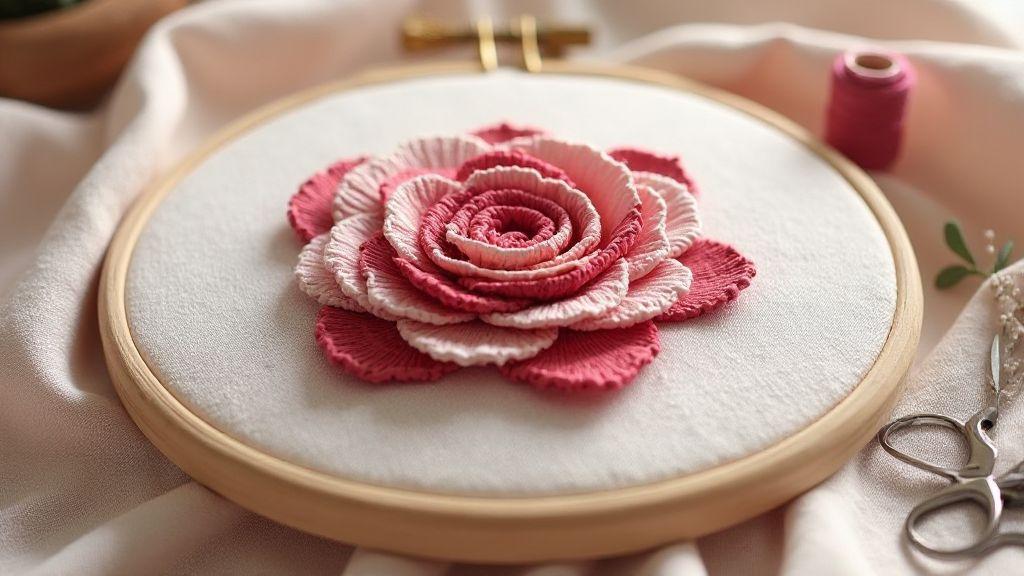
Begin with a circular base and mark where each wheel will sit. Use tight, even stitches to build the first wheel, letting spokes radiate like sunbeams. When shaping each petal, pull just enough to create a delicate curved edge while maintaining wheel symmetry. Layer the stitches to form a soft, rounded rose shape; think of each wheel as a petal built from a neat ring of stitches. Keep tension steady so petals appear uniform, and don’t hesitate to redo a wheel if needed. With practice, petals align into a natural bloom. Each wheel sharing seams with the next adds depth and prevents gaps. Tilt wheels slightly toward the center to cup the rose, tucking the next wheel beside it so edges touch softly. Outer wheels should wrap around inner ones, creating a full, lush look. If a wheel looks flat, add a light edge pass to lift it.
Practice makes petals perfect. For a more compact bouquet, tighten spokes and close layers; for a garden‑style look, give wheels a little more space. The rose comes alive when wheels are more petal than circle, leaning into each other with a gentle curve.
Controlling petal size with spoke length
Spoke length determines petal size. Short spokes yield neat, close petals; longer spokes push edges outward for a larger bloom. Start with a standard length, then test on scrap fabric. For a tighter rose, keep spokes short and build inner layers; for a looser look, lengthen spokes and let outer wheels flare. Maintain even tension when adjusting spoke length; uneven spokes distort the edge. Change lengths gradually—two or three wheels at a time—for a deliberate transition. Small tweaks in spoke length can dramatically alter the rose’s character, from classic to expressive.
Layering wheels for a full look
Layering is the secret to a full, dimensional rose. Start with a small core wheel, then add larger wheels around it, offset slightly for natural petal placement. Align spokes so they tuck between the previous layer’s gaps. Overlap locks layers together and adds depth. If a layer lies flat, lift the edge with a few extra stitches and shape it into a gentle curve. Vary wheel sizes to mimic real petals; stitch along inner rims where wheels meet to keep the shape resilient. The end result should feel like you could pluck a soft, velvet rose from the fabric.
Finishing the center
Finish with a tight cluster of short stitches at the center to anchor the rose and give it a focal point. Build a dense little bundle in a circular pattern. Trim stray threads and reshape as needed. A tiny contrasting satin dot can add character without overpowering the petals. The center should read as the flower’s heart—polished and secure.
Woven wheel stitch tips and tricks for beginners
You’re working with a classic technique that should feel easy and confident. Treat the Woven Wheel Stitch as a tiny compass: build spokes, then weave gentle curves to form a clean, rounded shape. Start with a steady hand and light tension so stitches sit evenly. Practice on scrap cloth first with a simple circular motif to see how spokes align and how weaving holds shape as you move outward. Focus on symmetry rather than speed. With time, your movements become automatic and stitches smoother. Tips: keep the needle perpendicular to the fabric, pull just enough to secure the thread without puckering, and rotate the fabric to maintain even tension on all sides. You’ll soon have a tidy wheel that lays flat and neat.
When you’re ready to push further, vary wheel size and density. A tighter wheel creates a bold point; a larger wheel reads lighter and airier. Alternate between solid fills and open spokes for different textures. Layer Woven Wheel Stitches with other decorative stitches to build complexity. Outline a rose or leaf with a circle of wheels, then fill inside for depth. Consider fabric type and thread weight—finer fabrics need lighter hands, thicker fabrics tolerate firmer tension. The rhythm of wheel and weave becomes your signature detail.
Common mistakes and fixes
Uneven spokes are common. If spokes drift, reanchor with a shorter tail and resew the first few spokes with steady needle angles. If a wobble occurs mid‑stroke, pause, loosen slightly, and realign. Tighten gradually to avoid distorting the wheel. Gaps between spokes can be closed by tightening slightly and reworking nearby stitches. Edge puckering happens when fabric tightens; reduce tension, lift the needle higher before pulling, and let the fabric settle. If needed, switch to lighter thread or smaller needle. Stabilize fabric with a hoop or frame to maintain edge tension. If a wheel looks flat, add more spokes or adjust weaving tightness for dimension. For color changes, secure the old thread with a tiny knot on the back or weave the end into the following stitches. Plan soft transitions with similar hues to maintain harmony. Always check the backside for tangled threads to prevent peeking through.
Thread choices that change the look
Thread choice significantly changes the wheel’s personality. Fine, smooth cotton embroidery floss yields crisp spokes with subtle sheen—great for a refined, precise wheel. For more texture and a rustic feel, try single‑strand linen or thicker pearl cotton; the wheel becomes bolder with defined lines. For a soft, painterly effect, blend slightly fuzzy threads or a silk blend to give the rose a luminous glow. Match thread weight to fabric to avoid puckers or vanishing lines. Glossy threads reflect light for a brighter wheel; matte threads absorb light for a subtler, antique vibe. Test two wheels side by side on scrap—one with bright cotton and another with soft rayon—to compare how the wheel sits and how light catches each stitch. For a classic rose, medium‑weight cotton or silk‑wrapped thread often offers the best balance of color depth and definition.
Simple fixes while you stitch
If a wheel begins to skew, pause and realign spokes rather than forcing the stitch. Tighten loose spokes gradually in small steps. If the edge peters toward puckering, back off tension slightly, re‑position, and resume with lighter pressure. Check in with your fingers every few spokes to catch issues early. To avoid messy tails, secure the tail with a small knot on the back or weave it into the next stitches. If you run short on thread, join a new length discreetly by threading under a few secure stitches, then continue. A calm, deliberate pace yields a neat, professional finish.
Woven wheel stitch pattern for rose and design ideas
The Woven Wheel Stitch brings a rose to life with a simple foundation and room to experiment. Start with a tight center and build petals around it, using light turns and even tension. Treat each spoke as a compass pointing toward a natural bloom. With bold stitches and shading, your rose gains depth. Use this stitch to explore mini leaves, curling petals, and subtle highlights that catch the light.
As you work, the wheel shape radiates from the core to create a tidy, circular rose that sits well on fabric. Vary wheel sizes to adjust the scale, then fill gaps with shorter stitches for depth. For design ideas, try a single rose in the center of a napkin or a small bouquet along a bracelet edge. Keep spokes evenly spaced and tension steady so the bloom stays balanced across your project. The Woven Wheel Stitch is versatile enough to be the focal point or a decorative accent. For a quick win, use a single color for a clean look or layer two shades for light and shadow. Practice makes your roses more confident with each pass. Trim tails as you go to keep the wheel neat.
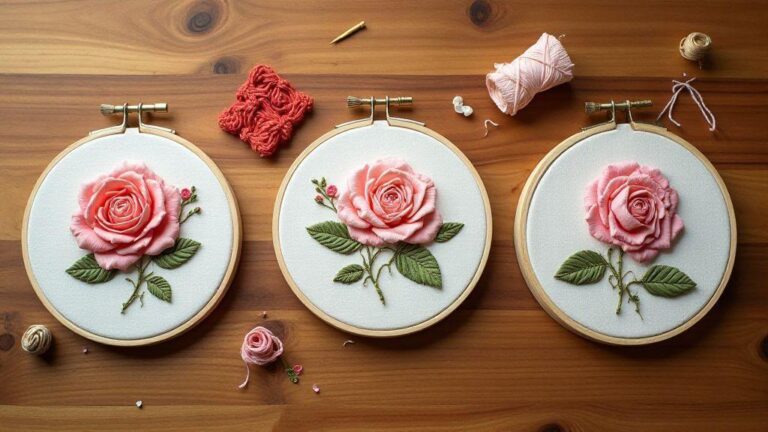
Scaling the rose for different projects
You can scale the rose up or down without losing the wheel’s charm. To make a larger rose, start with a bigger center and add spokes around it, keeping the center tight. For a smaller rose, use a smaller center and shorter spokes. Maintain symmetry by counting spokes and keeping consistent gaps. A well‑scaled rose looks balanced on napkins, bags, or patches. When adapting size, adjust thread length per spoke: longer spokes create bolder petals, shorter ones yield a more delicate bloom. If stitching on curves, test a couple of spokes on scrap fabric first to see how the rose sits. For garments, scale the rose to fit the space without crowding other elements. A mid‑size rose works well on fabric panels or cuffs. For borders, repeat the wheel at regular intervals and taper each rose slightly to form a cohesive line.
Combining stitches for depth
Blend the Woven Wheel Stitch with other stitches to add depth. Pair it with satin stitch for petals that glow from within, or outline the wheel with a fine backstitch to define edges. Layer lighter centers with darker outer edges to mimic natural shading. Add small leaf stitches around the rose for contrast, and use a fine fill stitch in petals for texture and tiny seed stitches at the base to hint at stems or growth. Experiment with thread weights—finer for highlights, thicker for shadows—to achieve a realistic feel. For a bolder look, layer metallic thread or high‑contrast color along the wheel’s rim. Test tension on scrap fabric first to avoid puckering. Depth and drama come from thoughtful stitch pairings.
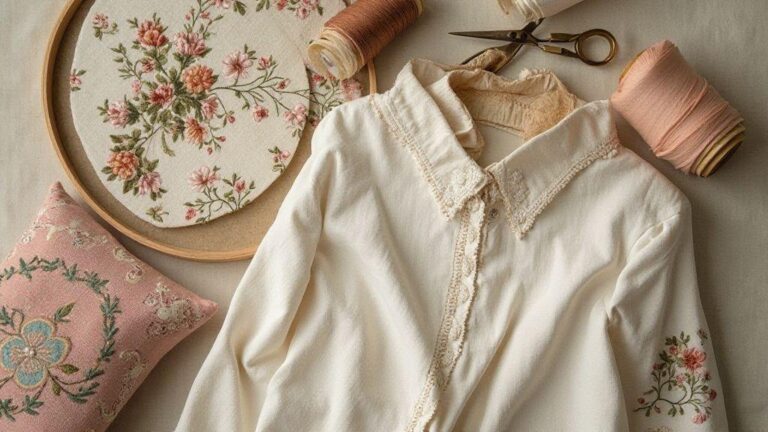
Pattern placement tips
Place the rose where it complements the fabric flow. Mark center alignment with a light pencil or fabric‑safe erasable pen. Position the wheel so petals curve toward the nearest seam or edge for an intentional look. On sleeves or curves, tilt the wheel to follow the fabric’s movement. Consider surrounding motifs for cohesion: a single rose can anchor a corner, while a small bouquet can form a border. Space roses evenly and keep a consistent scale. On garments, visualize placement with pins or a water‑soluble marker before committing. When placing multiple roses, maintain rhythm: same size, even spacing, and alternating placements along seams. If the fabric texture or pattern calls for it, adjust a rose’s position slightly.
Woven rose embroidery technique and finishing touches
Master a stunning woven rose that sits proudly on fabric. Start with a sturdy base thread and a sharp needle for tight, neat stitches. Trace the rose shape lightly, then set the foundation with central stitches to prevent wandering. Keep tension even as you guide the wheel in a natural spiral, layer by layer. Finish with subtle details like a backstitch for the stem and a satin edge to frame the petals. Balance texture and shine by using a glossy thread for highlights on outer petals and a matte shade for the inner petals to push depth. A gentle thread twist helps mimic petal curvature, keeping the rose alive rather than flat. Don’t rush the finish; allow space between petals so the rose breathes on the fabric. If you see gaps, fill them with fine, short passes of the same color to maintain cohesion. Backing and stabilization help prevent shifting; a light fusible interfacing or tear‑away stabilizer works well. A touch of metallic thread in the center can add glow, but keep it restrained so the rose remains the star. The finishing touches should unify the piece—petals, shading, and backing—without overpowering the weave.
Using shading and color blending
To create depth, blend colors across petals with careful shading. Start with a base color and gradually introduce darker tones toward inner curves. Aim for a subtle transition, like a watercolor with thread: lighter tips and richer folds. Practice feathering highlights with a light thread on the outer edges and a slightly darker shade at inner folds. Work in short passes and check balance across the bloom. If color choices seem off, compare with real roses to see where light lands and where shadows form; adjust the mix in small increments. Keep the palette cohesive across the piece so the woven wheel stitches sing together rather than compete.
How to care for a full rose embroidered with woven wheel
Gentle care keeps the rose vibrant. Let embroidery rest flat for a day to set the stitches, then press from the back with a clean cloth on low heat. Hand wash cool and lay flat to dry if you must wash. Use a mild detergent and avoid bleach to preserve depth. Store away from direct sunlight to prevent fading. If you see loose threads, trim close and weave a few micro‑stitches to secure. If colors bleed, wash separately the first few times and then wash with similar shades. A light iron on the reverse side helps maintain crisp silhouette. This care plan extends the life of your art.
Final mounting and care
Mount your rose with a clean finish that highlights the bloom. Use fabric‑safe adhesive or tiny hand‑sewn dots behind the petals to secure without bulk. For framing, choose a matte backing and a soft, neutral mat to make the rose pop. After mounting, protect the piece with a breathable cover or light glass to keep dust and sun away. Handle the project by the fabric edges to minimize wear. Keep it in a stable environment with moderate humidity and steady temperatures, so the rose stays bold and beautiful.
About the technique
Woven Wheel Stitch: The Easiest Way to Embroider a Full Rose is not just a name—it’s a practical promise. This method offers reliable control, smooth curves, and a naturally layered look that reads as a real bloom on fabric. With practice, you’ll weave a colony of petals that feels cohesive, lively, and ready to wear or display.

I’m Sophie Caldwell, the author behind granaboom.com, and I believe hand embroidery is one of the simplest, most relaxing ways to create something beautiful with your own hands. I started this blog to help beginners learn hand embroidery without feeling overwhelmed by complicated instructions or “perfect” results.
Here you’ll find beginner-friendly guides to decorative embroidery stitches, along with clear step-by-step practice ideas and patterns you can use to build confidence. My focus is on making the learning process easy: simple explanations, helpful stitch combinations, and small projects that look polished even when you’re just starting out.
Welcome to granaboom.com—grab your hoop, choose a few colors, and let’s stitch one line at a time.